Tkinter Notebook Tab Styling & Customization Using ttk.Style
In this tutorial, you’ll learn multiple methods to customize the appearance of notebook tabs in Tkinter library.
These customizations include adjusting font sizes, border widths, hover effects, focus indicators, and creating a unique layout with vertical notebook tabs.
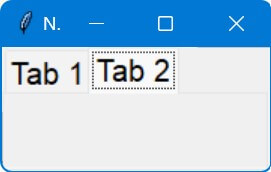
Set Tabs Font Size
To set the font size of the tabs in a Tkinter Notebook widget, you can use the font parameter in the configure method:
import tkinter as tk
from tkinter import ttk
root = tk.Tk()
root.title("Notebook Styling")
notebook = ttk.Notebook(root)
notebook.pack(expand=True, fill='both')
tab1 = ttk.Frame(notebook)
tab2 = ttk.Frame(notebook)
notebook.add(tab1, text='Tab 1')
notebook.add(tab2, text='Tab 2')
style = ttk.Style()
style.configure('TNotebook.Tab', font=('default', 15))
root.mainloop()
Output:
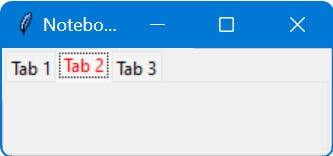
Selected Tab Font Color
To change the font color of a selected tab in Tkinter notebook, you can use the foreground option in the map method:
import tkinter as tk
from tkinter import ttk
root = tk.Tk()
root.title("Notebook with Rounded Tabs")
style = ttk.Style()
style.map("TNotebook.Tab", foreground=[("selected", "red")])
notebook = ttk.Notebook(root)
tab1 = ttk.Frame(notebook)
tab2 = ttk.Frame(notebook)
tab3 = ttk.Frame(notebook)
notebook.add(tab1, text="Tab 1")
notebook.add(tab2, text="Tab 2")
notebook.add(tab3, text="Tab 3")
notebook.pack(expand=True, fill="both")
root.mainloop()
Output:
Tab Hover Appearance
To set the hover appearance of tabs in a Tkinter Notebook widget, you can use the style.map() by setting the active and disabled colors:
import tkinter as tk
from ttkbootstrap import Style, Notebook
window = tk.Tk()
style = Style()
style.configure("TNotebook.Tab", background="white", foreground="black")
style.map("TNotebook.Tab",
          background=[("active", "lightblue"), ("disabled", "gray")],
          foreground=[("active", "black"), ("disabled", "gray")])
notebook = Notebook(window)
tab1 = tk.Frame(notebook)
notebook.add(tab1, text="Tab 1")
tab2 = tk.Frame(notebook)
notebook.add(tab2, text="Tab 2")
notebook.pack(expand=True, fill="both")
window.mainloop()
Output:
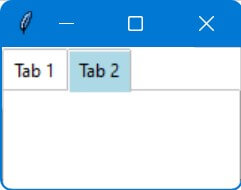
style.configure("TNotebook.Tab", ...) sets the default background and foreground colors of the tabs.
style.map("TNotebook.Tab", ...) defines the background and foreground colors for different states of the tabs, such as “active” (when the tab is being hovered over) and “disabled” (when the tab is disabled).
Tab Separators
Tkinter ttk.Style does not directly provide a way to style the separators between notebook tabs as it does for other elements.
However, you can do a similar effect by manipulating the padding and background color of the tabs.
This creates a visual separation between them.
import tkinter as tk
from tkinter import ttk
window = tk.Tk()
style = ttk.Style()
style.configure("TNotebook", tabposition="top")
style.configure("TNotebook.Tab", padding=[5, 10], background="lightgray")
style.configure("TNotebook.Separator", background="red", borderwidth=2)
notebook = ttk.Notebook(window)
tab1 = ttk.Frame(notebook)
notebook.add(tab1, text="Tab 1")
tab2 = ttk.Frame(notebook)
notebook.add(tab2, text="Tab 2")
notebook.pack(expand=True, fill="both")
window.mainloop()
Output:
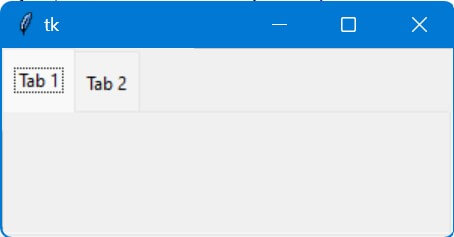
Vertical Notebook Tabs
To create vertical tabs for a Tkinter Notebook, you can do this by setting the tabposition="wn" configuration.
This sets the tab position to the left side ("wn" stands for “west-north”).
import tkinter as tk
from tkinter import ttk
window = tk.Tk()
window.title("Vertical Notebook Tabs")
style = ttk.Style()
style.configure("Custom.TNotebook", tabposition="wn")  # Set tab position to the left side
notebook = ttk.Notebook(window, style="Custom.TNotebook")
notebook.pack(fill=tk.BOTH, expand=True)
tab1 = ttk.Frame(notebook)
notebook.add(tab1, text="Tab 1")
tab2 = ttk.Frame(notebook)
notebook.add(tab2, text="Tab 2")
tab3 = ttk.Frame(notebook)
notebook.add(tab3, text="Tab 3")
label1 = ttk.Label(tab1, text="This is Tab 1")
label1.pack()
label2 = ttk.Label(tab2, text="This is Tab 2")
label2.pack()
label3 = ttk.Label(tab3, text="This is Tab 3")
label3.pack()
window.mainloop()
Output:

We create the Notebook widget using ttk.Notebook() and pass the custom style to it.
Mokhtar is the founder of LikeGeeks.com. He is a seasoned technologist and accomplished author, with expertise in Linux system administration and Python development. Since 2010, Mokhtar has built an impressive career, transitioning from system administration to Python development in 2015. His work spans large corporations to freelance clients around the globe. Alongside his technical work, Mokhtar has authored some insightful books in his field. Known for his innovative solutions, meticulous attention to detail, and high-quality work, Mokhtar continually seeks new challenges within the dynamic field of technology.