Python GUI examples (Tkinter Tutorial)
In this tutorial, we will learn how to develop graphical user interfaces by writing some Python GUI examples using the Tkinter package.
Tkinter package is shipped with Python as a standard package, so we don’t need to install anything to use it.
Tkinter package is a very powerful package. If you already have installed Python, you may use IDLE which is the integrated IDE that is shipped with Python, this IDE is written using Tkinter. Sounds Cool!!
We will use Python 3.6, so if you are using Python 2.x, it’s strongly recommended to switch to Python 3.x unless you know the language changes so you can adjust the code to run without errors.
I assume that you have a little background in Python basics to help you understand what we are doing.
We will start by creating a window then we will learn how to add widgets such as buttons, combo boxes, etc, then we will play with their properties, so let’s get started.
- 1 Create your first GUI application
- 2 Create a label widget
- 3 Adding a button widget
- 4 Get input using Entry class (Tkinter textbox)
- 5 Add a combobox widget
- 6 Add a Checkbutton widget (Tkinter checkbox)
- 7 Add radio buttons widgets
- 8 Add a ScrolledText widget (Tkinter textarea)
- 9 Create a MessageBox
- 10 Add a SpinBox (numbers widget)
- 11 Add a Progressbar widget
- 12 Add a filedialog (file & directory chooser)
- 13 Add a Menu bar
- 14 Add a Notebook widget (tab control)
- 15 Add spacing for widgets (padding)
Create your first GUI application
First, we will import Tkinter package and create a window and set its title:
from tkinter import *

window = Tk()

window.title("Welcome to LikeGeeks app")

window.mainloop()
The result will be like this:
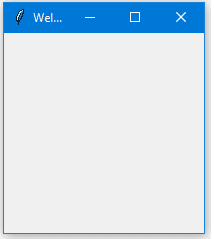
Awesome!! Our application just works.
The last line which calls the mainloop function, this function calls the endless loop of the window, so the window will wait for any user interaction till we close it.
If you forget to call the mainloop function, nothing will appear to the user.
Create a label widget
To add a label to our previous example, we will create a label using the label class like this:
lbl = Label(window, text="Hello")
Then we will set its position on the form using the grid function and give it the location like this:
lbl.grid(column=0, row=0)
So the complete code will be like this:
from tkinter import *

window = Tk()

window.title("Welcome to LikeGeeks app")

lbl = Label(window, text="Hello")

lbl.grid(column=0, row=0)

window.mainloop()
And this is the result:
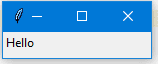
Without calling the grid function for the label, it won’t show up.
Set label font size
You can set the label font so you can make it bigger and maybe bold. You can also change the font style.
To do so, you can pass the font parameter like this:
lbl = Label(window, text="Hello", font=("Arial Bold", 50))
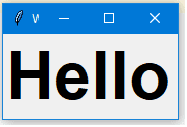
Note that the font parameter can be passed to any widget to change its font not labels only.
Great, but the window is so small, we can even see the title, what about setting the window size?
Setting window size
We can set the default window size using geometry function like this:
window.geometry('350x200')
The above line sets the window width to 350 pixels and the height to 200 pixels.
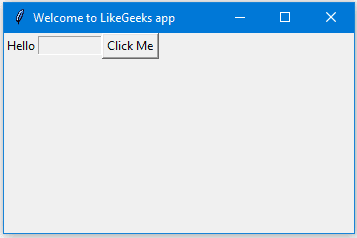
Let’s try adding more GUI widgets like buttons and see how to handle the button click event.
Let’s start by adding the button to the window, the button is created and added to the window the same as the label:
btn = Button(window, text="Click Me")

btn.grid(column=1, row=0)
So our window will be like this:
from tkinter import *

window = Tk()

window.title("Welcome to LikeGeeks app")

window.geometry('350x200')

lbl = Label(window, text="Hello")

lbl.grid(column=0, row=0)

btn = Button(window, text="Click Me")

btn.grid(column=1, row=0)

window.mainloop()
The result looks like this:
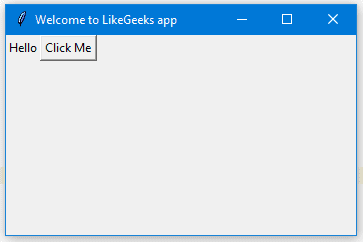
Note that we place the button on the second column of the window which is 1. If you forget and place the button on the same column which is 0, it will show the button only, since the button will be on the top of the label.
You can change the foreground for a button or any other widget using fg property.
Also, you can change the background color for any widget using bg property.
btn = Button(window, text="Click Me", bg="orange", fg="red")
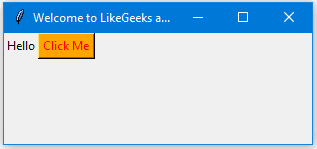
Now, if you tried to click on the button, nothing happens because the click event of the button isn’t written yet.
First, we will write the function that we need to execute when the button is clicked:
def clicked():

    lbl.configure(text="Button was clicked !!")
Then we will wire it with the button by specifying the function like this:
btn = Button(window, text=“Click Me”, command=clicked)
Note that, we typed clicked only not clicked() with parentheses.
Now the full code will be like this:
from tkinter import *

window = Tk()

window.title("Welcome to LikeGeeks app")

window.geometry('350x200')

lbl = Label(window, text="Hello")

lbl.grid(column=0, row=0)

def clicked():

    lbl.configure(text="Button was clicked !!")

btn = Button(window, text="Click Me", command=clicked)

btn.grid(column=1, row=0)

window.mainloop()
And when we click the button, the result as expected:
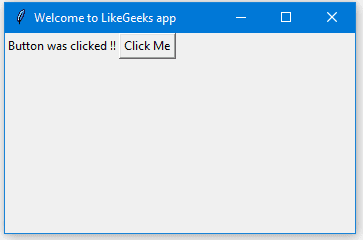
Cool!!
Get input using Entry class (Tkinter textbox)
In the previous Python GUI examples, we saw how to add simple widgets, now let’s try getting the user input using the Tkinter Entry class (Tkinter textbox).
You can create a textbox using Tkinter Entry class like this:
txt = Entry(window,width=10)
Then you can add it to the window using grid function as usual
So our window will be like this:
from tkinter import *

window = Tk()

window.title("Welcome to LikeGeeks app")

window.geometry('350x200')

lbl = Label(window, text="Hello")

lbl.grid(column=0, row=0)

txt = Entry(window,width=10)

txt.grid(column=1, row=0)

def clicked():

    lbl.configure(text="Button was clicked !!")

btn = Button(window, text="Click Me", command=clicked)

btn.grid(column=2, row=0)

window.mainloop()
And the result will be like this:
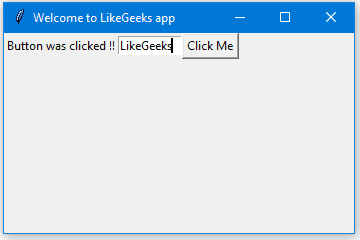
Now, if you click the button, it will show the same old message, what about showing the entered text on the Entry widget?
First, you can get entry text using get function. So we can write this code to our clicked function like this:
def clicked():

    res = "Welcome to " + txt.get()

    lbl.configure(text= res)
If you click the button and there is a text on the entry widget, it will show “Welcome to” concatenated with the entered text.
And this is the complete code:
from tkinter import *

window = Tk()

window.title("Welcome to LikeGeeks app")

window.geometry('350x200')

lbl = Label(window, text="Hello")

lbl.grid(column=0, row=0)

txt = Entry(window,width=10)

txt.grid(column=1, row=0)

def clicked():

    res = "Welcome to " + txt.get()

    lbl.configure(text= res)

btn = Button(window, text="Click Me", command=clicked)

btn.grid(column=2, row=0)

window.mainloop()
Run the above code and check the result:
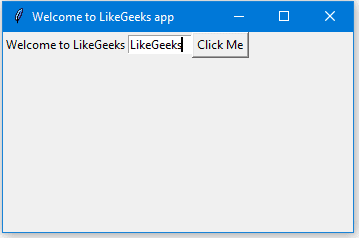
Awesome!!
Every time we run the code, we need to click on the entry widget to set focus to write the text, what about setting the focus automatically?
Set focus to the entry widget
That’s super easy, all we need to do is to call focus function like this:
txt.focus()
And when you run your code, you will notice that the entry widget has the focus so you can write your text right away.
Disable entry widget
To disable the entry widget, you can set the state property to disabled:
txt = Entry(window,width=10, state='disabled')
Now, you won’t be able to enter any text.
Add a combobox widget
To add a combobox widget, you can use the Combobox class from ttk library like this:
from tkinter.ttk import *

combo = Combobox(window)
Then you can add your values to the combobox.
from tkinter import *

from tkinter.ttk import *

window = Tk()

window.title("Welcome to LikeGeeks app")

window.geometry('350x200')

combo = Combobox(window)

combo['values']= (1, 2, 3, 4, 5, "Text")

combo.current(1) #set the selected item

combo.grid(column=0, row=0)

window.mainloop()
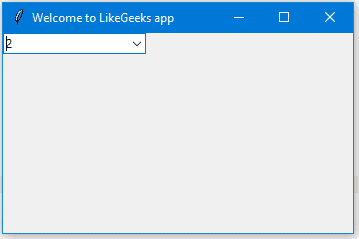
As you can see, we add the combobox items using the tuple.
To set the selected item, you can pass the index of the desired item to the current function.
To get the select item, you can use the get function like this:
combo.get()
Change Combobox Font Size
You can adjust the combobox font size using root.option_add by setting the custom font you want:
from tkinter import ttk
import tkinter as tk
custom_font = ("Verdana", 14)
root = tk.Tk()

# Set the font for all future combobox dropdown lists (default)
root.option_add("*TCombobox*Listbox.font", custom_font)
combobox1 = tk. ttk.Combobox(root, values=["Option A", "Option B"])
combobox1.pack()
combobox2 = tk. ttk.Combobox(root, values=["Choice 1", "Choice 2"])
combobox2.pack()
root.mainloop()
To create a checkbutton widget, you can use the Checkbutton class like this:
chk = Checkbutton(window, text='Choose')
Also, you can set the checked state by passing the check value to the Checkbutton like this:
from tkinter import *

from tkinter.ttk import *

window = Tk()

window.title("Welcome to LikeGeeks app")

window.geometry('350x200')

chk_state = BooleanVar()

chk_state.set(True) #set check state

chk = Checkbutton(window, text='Choose', var=chk_state)

chk.grid(column=0, row=0)

window.mainloop()
Check the result:
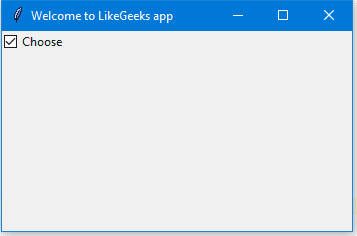
Here we create a variable of type BooleanVar which is not a standard Python variable, it’s a Tkinter variable, and then we pass it to the Checkbutton class to set the check state as the highlighted line in the above example.
You can set the Boolean value to false to make it unchecked.
Also, you can use IntVar instead of BooleanVar and set the value to 0 or 1.
chk_state = IntVar()

chk_state.set(0) #uncheck

chk_state.set(1) #check
These examples give the same result as BooleanVar.
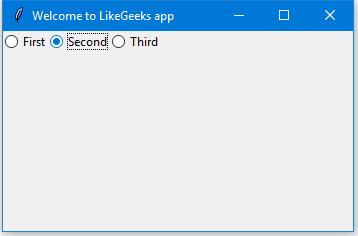
To add radio buttons, simply you can use RadioButton class like this:
rad1 = Radiobutton(window,text='First', value=1)
Note that you should set the value for every radio button with a different value, otherwise, they won’t work.
from tkinter import *
from tkinter.ttk import *
window = Tk()
window.title("Welcome to LikeGeeks app")
window.geometry('350x200')
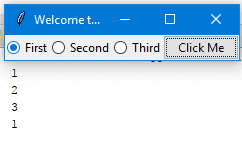
rad1 = Radiobutton(window,text='First', value=1)
rad2 = Radiobutton(window,text='Second', value=2)
rad3 = Radiobutton(window,text='Third', value=3)
rad1.grid(column=0, row=0)
rad2.grid(column=1, row=0)
rad3.grid(column=2, row=0)
window.mainloop()
The result of the above code looks like this:
Also, you can set the command of any of these radio buttons to a specific function, so if the user clicks on any one of them, it runs the function code.
This is an example:
rad1 = Radiobutton(window,text='First', value=1, command=clicked)

def clicked():

# Do what you need
Pretty simple!!
To get the currently selected radio button or the radio button value, you can pass the variable parameter to the radio buttons, and later you can get its value.
from tkinter import *

from tkinter.ttk import *

window = Tk()

window.title("Welcome to LikeGeeks app")

selected = IntVar()

rad1 = Radiobutton(window,text='First', value=1, variable=selected)

rad2 = Radiobutton(window,text='Second', value=2, variable=selected)

rad3 = Radiobutton(window,text='Third', value=3, variable=selected)

def clicked():

   print(selected.get())

btn = Button(window, text="Click Me", command=clicked)

rad1.grid(column=0, row=0)

rad2.grid(column=1, row=0)

rad3.grid(column=2, row=0)

btn.grid(column=3, row=0)

window.mainloop()
Every time you select a radio button, the value of the variable will be changed to the value of the selected radio button.
Add a ScrolledText widget (Tkinter textarea)
To add a ScrolledText widget, you can use the ScrolledText class like this:
from tkinter import scrolledtext

txt = scrolledtext.ScrolledText(window,width=40,height=10)
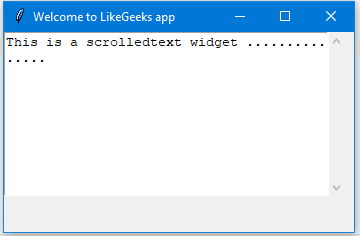
Here we specify the width and the height of the ScrolledText widget, otherwise, it will fill the entire window.
from tkinter import *

from tkinter import scrolledtext

window = Tk()

window.title("Welcome to LikeGeeks app")

window.geometry('350x200')

txt = scrolledtext.ScrolledText(window,width=40,height=10)

txt.grid(column=0,row=0)

window.mainloop()
The result as you can see:
Set scrolledtext content
To set scrolledtext content, you can use the insert method like this:
txt.insert(INSERT,'You text goes here')
Delete/Clear scrolledtext content
To clear the contents of a scrolledtext widget, you can use delete method like this:
txt.delete(1.0,END)
Great!!
Create a MessageBox
To show a message box using Tkinter, you can use the messagebox library like this:
from tkinter import messagebox

messagebox.showinfo('Message title','Message content')
Pretty easy!!
Let’s show a message box when the user clicks a button.
from tkinter import *

from tkinter import messagebox

window = Tk()

window.title("Welcome to LikeGeeks app")

window.geometry('350x200')

def clicked():

    messagebox.showinfo('Message title', 'Message content')

btn = Button(window,text='Click here', command=clicked)

btn.grid(column=0,row=0)

window.mainloop()
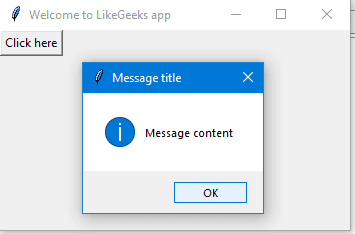
When you click the button, an info messagebox will appear.
Show warning and error messages
You can show a warning message or error message in the same way. The only thing that needs to be changed is the message function
messagebox.showwarning('Message title', 'Message content')  #shows warning message

messagebox.showerror('Message title', 'Message content')    #shows error message
Show askquestion dialogs
To show a yes no message box to the user, you can use one of the following messagebox functions:
from tkinter import messagebox

res = messagebox.askquestion('Message title','Message content')

res = messagebox.askyesno('Message title','Message content')

res = messagebox.askyesnocancel('Message title','Message content')

res = messagebox.askokcancel('Message title','Message content')

res = messagebox.askretrycancel('Message title','Message content')
You can choose the appropriate message style according to your needs. Just replace the showinfo function line from the previous line and run it.
Also, you can check what button was clicked using the result variable
If you click OK or yes or retry, it will return True value, but if you choose no or cancel, it will return False.
The only function that returns one of three values is askyesnocancel function, it returns True or False or None.
Add a SpinBox (numbers widget)
To create a Spinbox widget, you can use Spinbox class like this:
spin = Spinbox(window, from_=0, to=100)
Here we create a Spinbox widget and we pass the from_ and to parameters to specify the numbers range for the Spinbox.
Also, you can specify the width of the widget using the width parameter:
spin = Spinbox(window, from_=0, to=100, width=5)
Check the complete example:
from tkinter import *
window = Tk()
window.title("Welcome to LikeGeeks app")
window.geometry('350x200')
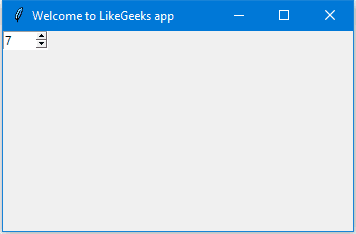
spin = Spinbox(window, from_=0, to=100, width=5)
spin.grid(column=0,row=0)
window.mainloop()
You can specify the numbers for the Spinbox instead of using the whole range like this:
spin = Spinbox(window, values=(3, 8, 11), width=5)
Here the Spinbox widget only shows these 3 numbers only 3, 8, and 11.
Set default value for Spinbox
To set the Spinbox default value, you can pass the value to the textvariable parameter like this:
var =IntVar()

var.set(36)

spin = Spinbox(window, from_=0, to=100, width=5, textvariable=var)
Now, if you run the program, it will show 36 as a default value for the Spinbox.
Add a Progressbar widget
To create a progress bar, you can use the progressbar class like this:
from tkinter.ttk import Progressbar

bar = Progressbar(window, length=200)
You can set the progress bar value like this:
bar['value'] = 70
You can set this value based on any process you want like downloading a file or completing a task.
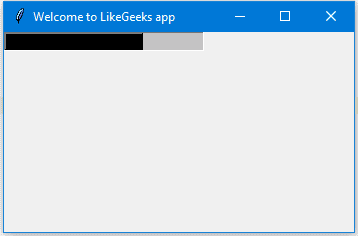
Change Progressbar color
Changing Progressbar color is a bit tricky, but super easy.
First, we will create a style and set the background color and finally set the created style to the Progressbar.
Check the following example:
from tkinter import *

from tkinter.ttk import Progressbar

from tkinter import ttk

window = Tk()

window.title("Welcome to LikeGeeks app")

window.geometry('350x200')

style = ttk.Style()

style.theme_use('default')

style.configure("black.Horizontal.TProgressbar", background='black')

bar = Progressbar(window, length=200, style='black.Horizontal.TProgressbar')

bar['value'] = 70

bar.grid(column=0, row=0)

window.mainloop()
And the result will be like this:
Add a filedialog (file & directory chooser)
To create a file dialog (file chooser), you can use the filedialog class like this:
from tkinter import filedialog

file = filedialog.askopenfilename()
After you choose a file and click open, the file variable will hold that file path.
Also, you can ask for multiple files like this:
files = filedialog.askopenfilenames()
Specify file types (filter file extensions)
You can specify the file types for a file dialog using the filetypes parameter, just specify the extensions in tuples.
file = filedialog.askopenfilename(filetypes = (("Text files","*.txt"),("all files","*.*")))
You can ask for a directory using the askdirectory method:
dir = filedialog.askdirectory()
You can specify the initial directory for the file dialog by specifying the initialdir like this:
from os import path

file = filedialog.askopenfilename(initialdir= path.dirname(__file__))
Easy!!
Add a Menu bar
To add a menu bar, you can use menu class like this:
from tkinter import Menu

menu = Menu(window)

menu.add_command(label='File')

window.config(menu=menu)
First, we create a menu, then we add our first label, and finally, we assign the menu to our window.
You can add menu items under any menu by using add_cascade() function like this:
menu.add_cascade(label='File', menu=new_item)
So our code will be like this:
from tkinter import *

from tkinter import Menu

window = Tk()

window.title("Welcome to LikeGeeks app")

menu = Menu(window)

new_item = Menu(menu)

new_item.add_command(label='New')

menu.add_cascade(label='File', menu=new_item)

window.config(menu=menu)

window.mainloop()
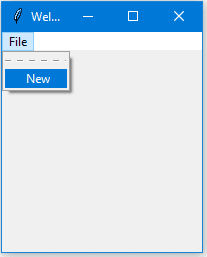
Using this way, you can add many menu items as you want.
from tkinter import *

from tkinter import Menu

window = Tk()

window.title("Welcome to LikeGeeks app")

menu = Menu(window)

new_item = Menu(menu)

new_item.add_command(label='New')

new_item.add_separator()

new_item.add_command(label='Edit')

menu.add_cascade(label='File', menu=new_item)

window.config(menu=menu)

window.mainloop()
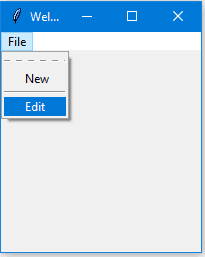
Here we add another menu item called Edit with a menu separator.
You may notice a dashed line at the beginning, well, if you click that line, it will show the menu items in a small separate window.
You can disable this feature by disabling the tearoff feature like this:
new_item = Menu(menu, tearoff=0)
Just replace the new_item in the above example with this one and it won’t show the dashed line anymore.
I don’t need to remind you that you can type any code that works when the user clicks on any menu item by specifying the command property.
new_item.add_command(label='New', command=clicked)
Add a Notebook widget (tab control)
To create a tab control, there are 3 steps to do so.
- First, we create a tab control using Notebook class
- Create a tab using Frame class.
- Add that tab to the tab control.
- Pack the tab control so it becomes visible in the window.
from tkinter import *

from tkinter import ttk

window = Tk()

window.title("Welcome to LikeGeeks app")

tab_control = ttk.Notebook(window)

tab1 = ttk.Frame(tab_control)

tab_control.add(tab1, text='First')

tab_control.pack(expand=1, fill='both')

window.mainloop()
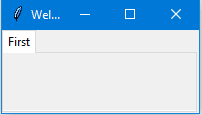
You can add many tabs as you want the same way.
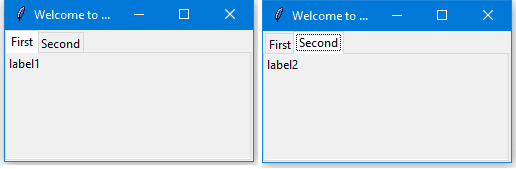
Add widgets to Notebooks
After creating tabs, you can put widgets inside these tabs by assigning the parent property to the desired tab.
from tkinter import *

from tkinter import ttk

window = Tk()

window.title("Welcome to LikeGeeks app")

tab_control = ttk.Notebook(window)

tab1 = ttk.Frame(tab_control)

tab2 = ttk.Frame(tab_control)

tab_control.add(tab1, text='First')

tab_control.add(tab2, text='Second')

lbl1 = Label(tab1, text= 'label1')

lbl1.grid(column=0, row=0)

lbl2 = Label(tab2, text= 'label2')

lbl2.grid(column=0, row=0)

tab_control.pack(expand=1, fill='both')

window.mainloop()
Add spacing for widgets (padding)
You can add padding for your controls to make it looks well organized using padx and pady properties.
Just pass padx and pady to any widget and give them a value.
lbl1 = Label(tab1, text= 'label1', padx=5, pady=5)
Just that simple!!
In this tutorial, we saw many Python GUI examples using Tkinter library and we saw how easy it’s to develop graphical interfaces using it.
This tutorial covers the main aspects of Python GUI development not all of them. There is no tutorial or a book can cover everything.
I hope you find these examples useful. Keep coming back.
Thank you.
Mokhtar is the founder of LikeGeeks.com. He is a seasoned technologist and accomplished author, with expertise in Linux system administration and Python development. Since 2010, Mokhtar has built an impressive career, transitioning from system administration to Python development in 2015. His work spans large corporations to freelance clients around the globe. Alongside his technical work, Mokhtar has authored some insightful books in his field. Known for his innovative solutions, meticulous attention to detail, and high-quality work, Mokhtar continually seeks new challenges within the dynamic field of technology.
Tk comin back strong in 2018!
Old is gold 🙂
rad1 = Radiobutton(window,text=’First’, value=1, command=clicked)
def clicked():
# Do what you need
this is not working properly.
Traceback (most recent call last):
File “C:/Users/nishumesh/Documents/Python/GUI/Ex-15.py”, line 13, in
rad1 = Radiobutton(window,text=’First’,value=1,command=clicked)
NameError: name ‘clicked’ is not defined
Write any code on clicked() function and when you click on the radio button, it should run the clicked() function code.
Hi Umesh,
the def definition needs to be placed before you refer to it in the rad1 initialization.
Cheers,
Senfman
you should add a code for function clicked
like pass
and define function before rad1
Hello, nice tutorial!
I just went through it, and well, pretty much mixed all the bits in one window!
So a problem showed up when wanting to use the Notebook widget, and it’s that I had a label at the very top acting as a “title” (the very first example you show), and wanted to add the tabs underneath the title, and it wouldn’t let me, it seems like the moment you use Notebook you need to put things inside (
_tkinter.TclError: cannot use geometry manager grid inside . which already has slaves managed by pack).Something else that I tried is, animate the Progressbar with a
for steps_ in range(100)and changing the value in every step after sleeping for like 0.5 sec, but that didn’t work either, it just “counted” and then filled it all in one go. Also I though of adding a progress bar in a messagebox, as in “Processing” and when it finishes loading, close the message box, but a quick query proved that to be trickier than I though.Well, thanks for the effort, and now I just gotta keep diggin! 🙂
Thanks.
Can you elaborate more by showing the code you’ve written so we can help?
Sorry I was out and about, I put up a quick example using your code, since I was using silly variable names and stuff, but it boils down to this:
My idea was to have the first label as a Title, much like an h1/h2 in web, in the inside the app window, and then below it having the tabs.
I assume this won’t work because it’s not the way to do it, I guess I’m missing come kind of container widget, where I could potentially add the tabs in it.
Your error happens because you mix pack and grid in the same window.
So if you use grid, don’t use pack on another component.
And regarding your positioning, try to use another row for the components under your label.
I mean use row 0 for your label and row 1 for others. Since you use row 0 for everything and that will put them on the same line.
Traceback (most recent call last):
File “C:/Users/tab.py”, line 32, in
tab_control.pack(expand=1, fill=’both’)
File “C:\Users\lib\tkinter\__init__.py”, line 2140, in pack_configure
+ self._options(cnf, kw))
_tkinter.TclError: cannot use geometry manager pack inside . which already has slaves managed by grid
I think you are using both grid and pack on the same window for different controls which is not correct.
Hi Max… do you know of any “DataGrid” component to use in python…
here is a demo link I quick google of the .net dataGrid “https://youtu.be/Sm5mxkytfWk”
I think you should try something like TurboGears.
hi,
it was nice tutorial, but i want to know more, for example how to save your contents or values, data in a file txt, and also i want to know how to create a button that each time i click on it create’s a new button :/
Hey,
The above examples shows all examples you mentioned if you understand them well.
Ex: we showed how to create a button and we showed how to program the click event.
So you can put the button creation code in the click event to achieve what you want. So the idea is so simple.
from tkinter.ttk import *
why is this giving me an error , using python 3.6?? plz help
You should specify the error, otherwise, How I should give you an answer.
A very late reply, but I think you should change your code into this.
“`from tkinter import *“`
That should work then, it is absolutely wrong to import from a function within a module. It will really give out an error if you do so.
thanks for your fast respond 🙂
yes i did understand every each one of the examples, but tell me if i created this button with a command that create another button each time i click on it every created button will have the same name,text, values and everything. i want for every button to be unique, how i can do that? i tried loops but didn’t work for me 🙁
Well,
If you are using Python 3.6, you can use exec function with f formatting to generate dynamic variables like this:
from tkinter import *

window = Tk()

for x in range(0, 3):

    exec(f'btn_{x} =  Button(window, text="Click Me")')
from tkinter.ttk import *
why is this giving me an error , using python 3.6?? plz help
and also says that Tk is not defined in follwing exp.
from tkinter import *
window = Tk()
window.title(“Welcome to LikeGeeks app”)
window.mainloop()
Did you call the file tkinter.py? If so, change it and it should work
File name is not important. You name it whatever you want and it will work.
Save a .py in the same folder as a python script using tkinter that you know works called “tkinter” and try and run your python script that works. I guarantee it wont run because when you try to import it will use the tkinter.py that you made and obviously not contain the necessary code. It was an error I was having earlier this week and I’ve just retested and I am certain that is the problem. It may or may not be this person’s problem but it definitely breaks tkinter code if you name a file tkinter.py
If he could share the error, we can help.
Can you show the error so we can help?
Excellent Tutorial
Thanks!
(radio buttons) In some cases, ‘selected = IntVar()’ will not work (ie: ‘variable=selected’ will not update the ‘selected’ var. In those cases ‘selected = IntVar(window)’ should do the trick. ( ‘window’ being the used name in ‘window = Tk()’)
I didn’t come across this case before, but anyway, thank you very much for the addition.
thanks for tutorial!
thats amazing!
You are welcome! Thanks!
Nice Tutorial , Really very informative and easy to learn
Tahnks
Thank you very much! Great to hear that!
Is there a way to return the entry that can be used for other functions?
For example, I ask user to enter 3 different numbers then pass these 3 numbers to another function and do the calculation.
Thank you in advance.
You can call the function normally inside the button click event. This function can carry any number of parameters.
Thank you. Have always wanted to learn Tk gui, this makes is accessible
Great to know that! Best wishes.
It is me again.
In the Add radio buttons widgets part, can you define one radio button as default and displayed as it is selected? like in your example, the second radio button is selected.
You can set the default state to a radio button as selected by setting the variable parameter to selected
rad1 = Radiobutton(window,text='First', value=1, variable=selected)Set the default button you want when the radiobox is displayed by doing
selected.set(1) # default to first option
Correct, but the example is a bit different.
I’m choosing what I want then I get it’s number from the button.
You code selects the radio button by number.
Thank you for your help.
I have another question for a strange radio behavior.
For “Need Specific Number?” (radio 1 and radio 2) and “Want to Send email with different email address?”(radio 5 and radio 6), I can only select 1 of them. for example, if I select radio 1, then select radio 5 or radio 6, radio 1 is de-selected. I am not sure where I did wrong.
Could you kindly point out the correct way?
Here is my code
def enableSPNum() :entry5.configure(state = 'normal')
def disableSPNum() :
entry5.configure(state = 'disabled')
def diffEmail() :
entry8.configure(state = 'normal')
def defaultEmail() :
entry8.configure(state = 'disabled')
def submitReq() :
userID = entry1.get()
siteCode = entry2.get().upper()
firstName = entry3.get().title()
lastName = entry4.get().upper()
spNum = entry5.get()
vmEnable = select1.get()
agentID = entry7.get().lower()
eMail = entry8.get()
entry1 = Entry(root)
entry1.grid(column = 1, row = 0)
label1 = Label(root, text = 'userID : ')
label1.grid(column = 0, row = 0, sticky = E)
entry2 = Entry(root)
entry2.grid(column = 1, row = 1)
label2 = Label(root, text = 'Site Code :')
label2.grid(column = 0, row = 1, sticky = E)
entry3 = Entry(root)
entry3.grid(column = 1, row = 2)
label3 = Label(root, text = 'First Name :')
label3.grid(column = 0, row = 2, sticky = E)
entry4 = Entry(root)
entry4.grid(column = 1, row = 3)
label4 = Label(root, text = 'Last Name :')
label4.grid(column = 0, row = 3, sticky = E)
label5 = Label(root, text = 'Need Specific Number? :')
label5.grid(column = 0, row = 4, sticky = E)
rad1 = Radiobutton(root,text='Yes', value = 1, command = enableSPNum)
rad2 = Radiobutton(root,text='No (Default)', value = 2, command = disableSPNum)
rad1.grid(column = 1, row = 4)
rad2.grid(column = 2, row = 4)
entry5 = Entry(root, state = 'disabled')
entry5.grid(column = 1, row = 6)
label6 = Label(root, text = 'Extension :')
label6.grid(column = 0, row = 6, sticky = E)
label7 = Label(root, text = 'Voicemail Required? :')
label7.grid(column = 0, row = 7, sticky = E)
select1 = IntVar()
rad3 = Radiobutton(root,text='Yes', value = 3, variable = select1)
rad4 = Radiobutton(root,text='No', value = 4, variable=select1)
rad3.grid(column = 1, row = 7)
rad4.grid(column = 2, row = 7)
entry7 = Entry(root)
entry7.grid(column = 1, row = 8)
label8 = Label(root, text = 'Your userID :')
label8.grid(column = 0, row = 8, sticky = E)
label9 = Label(root, text = 'Want to send email with differnt email adrress? :')
label9.grid(column = 0, row = 9, sticky = E)
#selected = IntVar()
rad5 = Radiobutton(root,text='Yes', value = 5, command = diffEmail)
rad6 = Radiobutton(root,text='No', value = 6, command = defaultEmail)
rad5.grid(column = 1, row = 9)
rad6.grid(column = 2, row = 9)
entry8 = Entry(root, state = 'disabled')
entry8.grid(column = 1, row = 10)
label10 = Label(root, text = 'Full Email Address :')
label10.grid(column = 0, row = 10, sticky = E)
btn = Button(root, text = 'Submit', command = submitReq)
btn.grid(column = 2, row = 20)
You should set the variable value for all radio buttons not some of them only.
rad1 = Radiobutton(window,text='First', value=1, variable=selected)In your case, you just set the first two radio buttons.
Hope it helps.
thank you.
For me is well explained and usefull 🙂
Great to hear that! Thank you very much!
thank you very much u helped ya boy taylor do his program. yall helped meh w this. why wont the text move when i change column and row? ik i sound nooby, its just cos im in skl lol and my teacher doesnt help so i need ya help. also, i would like to click on the button, (which is saved as a gif) and then the page will change to another picture (also saved as a gif). (all in tkinter). is it possible u can help me with that? thanks a lot mate
Hello,
Can you share what code you used so we can help?
Regards,
Thank you very much, very good tutorial for a beginner 🙂
You are welcome!
Appreciate it.
Excellent work sir
i have a question. How can i show an image on my window(window form)? first i want to give my form blank square for an image then fill it with selected image. thanks
Thanks!
To show an image, you can use the canvas like this:
img=Image.open("Path to your image")photo=ImageTk.PhotoImage(img)
cv = tk.Canvas()
cv.pack(side='top', fill='both', expand='yes')
cv.create_image(50, 50, image=photo, anchor='nw')
Hope that helps.
Hi sir,
Please help me !! Actually I show my database on tkinter window through this code
global me
me.destroy()
me=Frame(root, width=2000,height=1500)
me.pack()
melabel=Label(me,text=”Company drives”,font=(“Times”,25))
melabel.place(x=500,y=10)
name = StringVar
scrolling_area = Scrolling_Area(me,height=400)
scrolling_area.place(x=100,y=80)
table = Table(me,
[“Company Name”, “Email id”,”Date of Drive”,”Worked on”,”work place”,”contact”,”Batch”,”Branch”,”Apply”],
column_minwidths=[100,120, 120,120,120,120,120,120,120,120])
table.pack(expand=True, fill=X)
table.on_change_data(scrolling_area.update_viewport)
conn = sqlite3.connect(“tpo.db”)
cur = conn.execute(“SELECT * FROM drivereg1 ORDER BY COMPANY ASC”)
data=[]
company=[]
i=10
for row in cur:
column=[]
# company.append(column)
data.append(column)
company.append(row[0])
print(row[0])
for r in row:
column.append(r)
a=tkinter.Button(table, text=row[0])
a.place(x=1000,y=100) #button is not place
table.set_data(data)
conn.commit()
then how to place a button on it….
To place a button on your window, you can use the grid method like this:
btn = Button(window, text=row[0])btn.grid(column=1, row=0)
Nicely written tutorial.
I am working on Raspberry Pi and found that Setting window size did not work. I tried: window.geometery(‘800×600’)
for example with no change in size.
Anyone else have problem?
My full code:
#From: https://likegeeks.com/python-gui-examples-tkinter-tutorial/
from tkinter import *
window = Tk()
window.title(“Welcome to LikeGeeks app”)
#lbl = Label(window, text= “Hello there my little friend.”, font=(“Arial Bold”,50))
lbl = Label(window, text= “Hello”, font=(“Arial Bold”,50))
lbl.grid(column=0, row=0)
window.geometery(‘800×600’)
#Start up our GUI
window.mainloop()
Hello,
Forrest,
You have an error. It should be:
window.geometry('800x600')Not
window.geometery(‘800×600’)Regards,
Thanks for narrowing it down to one line.
I looked and looked for the spelling error.
A great tutorial!
Thank you.
Thank you very much!
I wanted to read the text out of the scrolledtext window and found a way to do it with this function which I had a button call
***************************************************
def clicked():
# res = “We got text: ” + txt.get()
res = txt.get(“1.0”, “end-1c”)
print(res)
************************************
The argument ‘ “1.0”, “end-1c” ‘ is not at all obvious.
Sorry if this is a repeat…
I wanted to read the text out of the scrolledtext window.
I found a way to make a function to do so.
Full program:
**************************************************
#from:https://likegeeks.com/python-gui-examples-tkinter-tutorial/#comment-3236
from tkinter import *
from tkinter import scrolledtext
window = Tk()
window.title(“Welcome to LikeGeeks app”)
window.geometry(‘350×200′)
def clicked():
# res = “We got text: ” + txt.get()
res = txt.get(“1.0”, “end-1c”)
print(res)
def cleartext():
txt.delete(1.0,END)
print(“Cleared window”)
txt = scrolledtext.ScrolledText(window,width=40,height=10)
txt.grid(column=0,row=0)
txt.insert(INSERT,’You text goes here’)
btn = Button(window, text= “Press to get text”, command = clicked)
btn.grid(column=1, row=0)
btn2 = Button(window, text= “Press to clear text”, command = cleartext)
btn2.grid(column=1, row=1)
window.mainloop()
Hello,
I have a problem with buttons when I try to add background / foreground.
When I added “from tkinter.ttk import *” to the earlier file where we set background and foreground button colors the buttons disappear from the GUI and I get error. See below.
I am using Python 3.5.3 on Raspberry Pi.
***********************************************************
Traceback (most recent call last):
File “/home/pi/Python3/likegeeks_tutorial/tempGUI.py”, line 24, in
btn = Button(window, text=”Click Me”, background=”#c00″, relief=”flat”, command=clicked)
File “/usr/lib/python3.5/tkinter/ttk.py”, line 608, in __init__
Widget.__init__(self, master, “ttk::button”, kw)
File “/usr/lib/python3.5/tkinter/ttk.py”, line 553, in __init__
tkinter.Widget.__init__(self, master, widgetname, kw=kw)
File “/usr/lib/python3.5/tkinter/__init__.py”, line 2151, in __init__
(widgetName, self._w) + extra + self._options(cnf))
_tkinter.TclError: unknown option “-background”
**************************************************************
Full code:
**************************************************************
from tkinter import *
# from tkinter.ttk import * #This breaks the background and foregroud color set.
window = Tk()
window.title(“Welcome to LikeGeeks app”)
window.geometry(‘350×200’)
lbl = Label(window, text=”Hello”)
lbl.grid(column=0, row=0)
txt = Entry(window,width=10)
txt.grid(column=1, row=0)
def clicked():
res = “Welcome to ” + txt.get()
lbl.configure(text= res)
btn = Button(window, text=”Click Me”, background=”#c00″, relief=”flat”, command=clicked)
btn.grid(column=2, row=0)
window.mainloop()
This code works without errors:
from tkinter import *window = Tk()
window.title("Welcome to LikeGeeks app")
window.geometry('350x200')
lbl = Label(window, text="Hello")
lbl.grid(column=0, row=0)
txt = Entry(window,width=10)
txt.grid(column=1, row=0)
def clicked():
res = "Welcome to " + txt.get()
lbl.configure(text= res)
btn = Button(window, text="Click Me", background="#c00", relief="flat", command=clicked)
btn.grid(column=2, row=0)
window.mainloop()
Moktar,
Thanks for getting back to me.
To your code above of March 3, I added the line:
from tkinter.ttk import *
And again the button was broken when trying to add color.
Here is the error message:
Traceback (most recent call last):
File “/home/pi/Python3/likegeeks_tutorial/TKinter_ButtonColor2.py”, line 16, in
btn = Button(window, text=”Click Me”, background=”#c00″, relief=”flat”, command=clicked)
File “/usr/lib/python3.5/tkinter/ttk.py”, line 608, in __init__
Widget.__init__(self, master, “ttk::button”, kw)
File “/usr/lib/python3.5/tkinter/ttk.py”, line 553, in __init__
tkinter.Widget.__init__(self, master, widgetname, kw=kw)
File “/usr/lib/python3.5/tkinter/__init__.py”, line 2151, in __init__
(widgetName, self._w) + extra + self._options(cnf))
_tkinter.TclError: unknown option “-background”
The color button method appears to be incompatible with the line
from tkinter.ttk import *
This makes the colored button incompatible with for example the combobox widget where the import of tkinter.ttk is required.
I do not understand the root cause or a work around. Perhaps the import of tkinter.ttk need to be more restrictive like and import as, but now I am feeling over my head.
Why did you imported tkinter.ttk?
However, you can import your needed packages from it like this:
from tkinter.ttk import YOUROBJThanks for posting this topic!
You’re welcome! Thanks!
thanks my topic in gui
You’re welcome!
what all stuffs you make mokhtar
Thanks!
Any help is really appreciate as I’m stuck.
I have this code:
from tkinter import *
from PIL import Image, ImageTk
class Window (Frame):
def __init__(self, master = None):
Frame.__init__(self,master)
self.master = master
self.init_window()
def init_window(self):
self.master.title(“Please send help thanks.”)
self.pack(fill=BOTH, expand=1)
#quitButton = Button(self, text=”Quit”, command=self.client_exit)
#quitButton.place(x=0, y=0)
menu = Menu(self.master)
self.master.config(menu=menu)
file = Menu(menu, tearoff=0)
file.add_command(label=’Open’)
file.add_command(label=’Exit’, command=self.client_exit)
menu.add_cascade(label=’File’, menu=file)
edit = Menu(menu, tearoff=0)
edit.add_command(label=’Show Image’, command=self.showImg)
edit.add_command(label=’Show Text’, command=self.showTxt)
menu.add_cascade(label=’Edit’, menu=edit)
def showImg(self):
load = Image.open(‘A380.jpg’)
render = ImageTk.PhotoImage(load)
img = Label(self, image=render)
img.image = render
img.place(x=0,y=0)
def showTxt (self):
text = Label(self, text=’Good morning sir!’)
text.pack()
def client_exit(self):
exit()
root = Tk()
root.geometry(“400×300”)
app = Window(root)
root.mainloop()
but when I try to add a new code below “menu.add_cascade(label=’Edit’, menu=edit)” with this;
help = Menu(menu, tearoff=0)
help.add_command(label=’Help Index’)
help.add_command(label=’About Us’)
menu.add_cascade(label=’Help’, menu=help)
It then gives me weird error like;
Traceback (most recent call last):
File “testing10.py”, line 5, in
class Window (Frame):
File “testing10.py”, line 35, in Window
help = Menu(menu, tearoff=0)
NameError: name ‘menu’ is not defined
It works perfectly!
I tried your code and nothing is wrong.
How? If I try to add without the help.add command, everything else work fine but If i add that new codes it gave me error
can you show me the codes you did? cause it doesn’t work for me
This code works perfectly.
from tkinter import *class Window (Frame):
def __init__(self, master = None):
Frame.__init__(self,master)
self.master = master
self.init_window()
def init_window(self):
self.master.title("Please send help thanks.")
self.pack(fill=BOTH, expand=1)
menu = Menu(self.master)
self.master.config(menu=menu)
file = Menu(menu, tearoff=0)
file.add_command(label='Open')
file.add_command(label='Exit', command=self.client_exit)
menu.add_cascade(label='File', menu=file)
edit = Menu(menu, tearoff=0)
edit.add_command(label='Show Text', command=self.showTxt)
menu.add_cascade(label='Edit', menu=edit)
help = Menu(menu, tearoff=0)
help.add_command(label='Help Index')
help.add_command(label='About Us')
menu.add_cascade(label='Help', menu=help)
def showTxt(self):
text = Label(self, text='Good morning sir!')
text.pack()
def client_exit(self):
exit()
root = Tk()
root.geometry("400x300")
app = Window(root)
root.mainloop()
Duuuudee this is so helpful for beginners, and also can you make more of these tutorials these are very helpful. Thanks!!
Thank you very much for your words. That keeps me doing more.
Best Regards
Thanks for effort!Very useful content
Thanks a lot!
this module is for kids pfff
thank you bro i am so greatfull you helped me really thank u. 🙂
You’re welcome! Thanks!
Thanks
Very useful and clear for the use of the various widgets, however I have not found how to obtain in Python the data entered in the forms.
Easy!
When creating your Entry widget, set the textvariable like this:
txt = Entry(window, width=10, textvariable=entry_var)Then you can get the entered text like this:
entry_var.get()Hope that helps!
Hi, im a newbie in python and tkinter, i followed the example and work well,when i open my browser and encode the url, window form appear. I tried to access my laptop in my smartphone, i encode the url to access my sample site in tkinter but the sample window appear in my laptop not in my smart phone, my question is tkinter can run like a web base system? Thanks in advance
Hello,
You can’t run Tkinter widgets inside web pages.
Great tutorial, have learned from the ground up with this alone. Have one question though:
When messagebox display an error mesage for example, does clicking ok or the x give out a true or false statement?
You can print the response returned from it and check each time what you got.
Apply the same code as described in the tutorial.
I love importing the menu bar from os!
All of us love doing it in a simple way.
thank you for the tutorial i can finally expand the basement store to the dark web!
Good luck to you!
Thank you for the examples here. Even though I do a lot via command-line, I use these quick structural examples to get the feel of where I am going. That being creating tools for my own use. Can I assume you have escalating examples as well?
Thank you!
You’re welcome!
Once you know the basics, it will be easy for you to build anything using Tkinter.
It’s the same concept.
Wow! of all the tutorials I could find, yours was the most direct, to the point, and easiest to follow. If I were a millionaire I would gladly make a huge donation for your efforts. But alas, a huge thanks and job well done are all I can spare.
Thank you very much for the kind words!
That drives me to do my best.
Thanks for the great tutorial! It’s great to see a lot of basic concepts laid out so simply, and the tutorial is a really good springboard. It would be tremendous help if you could / would address one more topic: frames. That seems to be key to composing GUI applications that need to have areas of the screen that have groups of widgets and are able to be controlled separately. Any chance of adding content on frames?
You’re welcome!
Regarding frames, I will add it to my upcoming tutorials and I’ll do my best to add headings about them.
Regards,
Can someone help me to write out a Quiz template with a login and register which also saves a username and password to a textfile Thanks.
Examples of using text fields are very well explained.
If you have an issue, you can type it here and we’ll try to help.
Hey Mokhtar.
Thanks for the very nice tutorial on Tkinter.
May I ask how you add the code blocks in your blog post?
Is it some kind of plugin you are using?
Thanks,
Antonios
Hi Antonios,
Thank you very much for the comment.
Yes, I’m using a plugin called Crayon for adding code snippets.
Cool, thanks a lot for the answer!
You’re welcome!
Hey!
I am working on a project for school and for that I need to make an program where u fill in a text box, when u write a name in that box and press the button, it wil search a csv file for that name and shows that name + phonenumbers, this is my code right now, but I don’t know how to implement the code for searching the column: from tkinter import *
from tkinter import filedialog
window = Tk()
window.title(“Telefoonlijst Hamofa”)
window.geometry(‘350×200’)
lbl = Label(window, text=”Hallo, wie zoekt u?”)
lbl.grid(column=0, row=0)
txt = Entry(window,width=10)
txt.grid(column=1, row=0)
txt.focus()
def clicked():
res = “Dit zijn de gegevens van ” + txt.get()
lbl.configure(text=res)
btn = Button(window, text=”Zoek”, bg= “black”, fg=”red”, command=clicked)
btn.grid(column=2, row=0)
window.mainloop()
I am from Belgium so there are some dutch words in it, but if you can help, I may pass this year!
Seppe
Hi,
You can search CSV files using Python like this:
import csv

my_file = csv.reader(open('myfile.csv', "rb"), delimiter=",")

for row in my_file:

    if row[1] == "my Search String" :

         print row
Hope that helps!
This was extremely helpful! Gave me a lot of practice material
Thank you very much.
Right now I have this:
“from tkinter import *
from tkinter.filedialog import askopenfilename
from tkinter import messagebox
import csv
window = Tk()
window.title(“Telefoonlijst Hamofa”)
window.geometry(‘350×200’)
lbl = Label(window, text=”Hallo, wie zoekt u?”)
lbl.grid(column=0, row=0)
txt = Entry(window,width=10)
txt.grid(column=1, row=0)
txt.focus()
def clicked():
res = “Dit zijn de gegevens van ” + txt.get()
lbl.configure(text=res)
file = open(“C:\\Users\\Seppe\\Desktop\\GIP\\Telefoon.csv”, “r”)
readFile = csv.reader(file)
for row in readFile:
if row[1] == “txt”
print row
btn = Button ( window, text= “Zoek”, bg= “black”, fg= “red”, command=clicked)
btn.grid(column=2, row=0)”
But get this Error:
” if row[1] == “txt”:
IndexError: list index out of range”
Anyone that can help me?
The error because of your file content I guess.
The index starts from zero.
Well, yeah thats what i’m trying to find. The file has 7 rows but says that it is already out of index with row 1..
Check your file and debug line by line and you’ll find the error.
If i fill a name in, in the enrty inputbox and press the button. It will search that name in the csv file and show the data from that name, I don’t how do that, this is what I have and nothing can be changend, tried a lot of things, maybe you guys can help me? 🙂
Code
“from tkinter import *
from tkinter.filedialog import askopenfilename
from tkinter import messagebox
import csv
csvFileArray = []
window = Tk()
window.title(“Telefoonlijst Hamofa”)
window.geometry(‘350×200’)
lbl = Label(window, text=”Hallo, wie zoekt u?”)
lbl.grid(column=0, row=0)
lbl = Label(window, text= “NAAM”)
lbl.grid(column=0, row=1)
lbl = Label(window, text= “FIXED”)
lbl.grid(column=0, row=2)
lbl = Label(window, text= “DIRECT”)
lbl.grid(column=0, row=3)
txt = Entry(window, width=10)
txt.grid(column=2,row=1)
txt = Entry(window, width=10)
txt.grid(column=2,row=2)
txt = Entry(window, width=10)
txt.grid(column=2, row=3)
def NAAM():
csvfile = open(‘Telefoon.csv’,’r’)
for row in csv.reader(csvfile, delimiter = ‘;’):
csvFileArray.append(row)
next
print(csvFileArray[1])
def NUMMER():
csvfile = open(‘Telefoon.csv’, ‘r’)
for row in csv.reader(csvfile, delimiter = “;”):
csvFileArray.append(row)
next
print (csvFileArray[2])
def DIRECT():
csvfile = open(‘Telefoon.csv’, ‘r’)
for row in csv.reader(csvfile, delimiter =’;’):
csvFileArray.append(row)
next
print (csvFileArray[3])
btn = Button ( window, text= “Zoek”, bg= “black”, fg= “red”, command=NAAM)
btn.grid(column=3, row=1)
btn1 = Button ( window, text= “Zoek”, bg= “Black”, fg= “red”, command=NUMMER)
btn1.grid(column=3, row=2)
btn2 = Button( window, text = “Zoek”, bg=”Black”, fg=”red”, command=DIRECT)
btn2.grid(column=3, row=3)”
Are you sure about the delimiter? Is it a semicolon in your file?
Also, you can debug the code line by line to know where the error comes from.
Hi! I wrote the following code for a small game.
But getting issue with passing the variables from one function to other function.
Can any one please help me to get the solution.
my code:
from tkinter import *
import random
from tkinter import scrolledtext
game = Tk()
game.geometry(“600×300-8-200”)
game.title(“Bulls and Cows game”)
lb = Label(game, text=”You are going to play Bulls and Cows game”, font=(“Calibri”,10))
lb.grid(row=0, column=0)
def startgame():
data.delete(0, END)
msg.delete(‘1.0’, END)
c1 = random.randint(1, 9)
c2 = random.randint(1, 9)
while c2 == c1:
c2 = random.randint(1, 9)
c3 = random.randint(1, 9)
while c3 == c2 or c3 == c1:
c3 = random.randint(1, 9)
c4 = random.randint(1, 9)
while c4 == c3 or c4 == c2 or c4 == c1:
c4 = random.randint(1, 9)
numgess = str(c1)+str(c2)+str(c3)+str(c4)
trials = 1
msg.insert(‘1.0’, ‘Find the 4 digit number that I have guessed\n’)
msg.insert(‘1.0’, ‘Enter the 4 digit number in the above box:\n’)
fr2 = Frame(game)
fr2.grid(row=1, column=0)
sb = Button(fr2, text=”Start Game”, command=startgame)
sb.grid (row=0, column=0)
def endgame():
data.delete(0,END)
msg.delete(‘1.0’,END)
eb = Button(fr2, text=”End Game”, command=endgame)
eb.grid(row=0, column=1)
fr1 = Frame(game)
fr1.grid(row=2, column=0)
data = Entry(fr1, width=10)
data.grid(row=0, column=1)
data.focus()
def entered():
guess = data.get()
num = str(guess)
while num != numgess:
print(numgess, type(numgess))
print(num, type(num))
bulls = 0
cows = 0
for i in range(0, 4):
if num[i] == numgess[i]:
bulls += 1
for j in range(0, 4):
if num[i] != numgess[i] and num[i] == numgess[j]:
cows += 1
else:
continue
msg.insert(‘1.0’, ‘Your guess {0} is in correct. You have {1} bulls, {2} cows {3}.\n’.format(num, bulls, cows, numgess))
msg.insert(‘1.0’, ‘Guess the 4 digit number again\n’)
trials += 1
data.delete(0,END)
msg.insert(‘1.0’, ‘Your guessed the right number in {0} trials and the number is {1}.\n’.format(trials, num))
bt1 = Button(fr1, text=”Enter”, command=entered)
bt1.grid(row=0, column=2)
lb1 = Label(fr1, text=”Enter the 4 digit number here”)
lb1.grid(row=0, column=0)
msg = scrolledtext.ScrolledText(game,width=80,height=10)
msg.grid(row=3, column=0)
game.mainloop()
Error is :
Exception in Tkinter callback
Traceback (most recent call last):
File “C:\ProgramData\Anaconda3\lib\tkinter\__init__.py”, line 1705, in __call__
return self.func(*args)
File “C:/Python/myprogs/HelloWorld/BCGame_GUIb.py”, line 74, in entered
while num != numgess:
NameError: name ‘numgess’ is not defined
This is simple.
You need to define the variable
numgessoutside the function and you can access it from where.Thanks for the reply.
I have already tried that.
When ever I click Enter button every time the variable (numgess) is resetting to outside initialized value.
It is not taking the value from the previous executed function.
I have to store the data from previous executed function and same has to be used in another function.
Now I got what you mean.
That’s super easy!
Define the variable outside the functions and when you want to set it inside any function, use the global keyword like this:
global numgessDone.
Thanks a lot…
It worked.
You’re welcome!
I am following this bless forum leading by sir Mokhtar Ebrahim as the forum mentor. Please I am a novice to GUI. I am undergoing a research project on Biometric fingerprint attendance system for my department. Please esteem personalities help me out from starting point. Thank you all and remain bless.
Hi,
You can get a free Python scripts from GitHub or Sourceforge to start with and then you can edit them according to your needs.
There is a ton of them, choose the suitable one that fits your requirements.
kindly tell me about how system will give appropiate name according to document content in python tkinter
for e.g in ms.word when we save file it automatically generate name according to document and set it as default
kindly tell me
You can set file name using by setting the initialfile
initialfile="myfile.txt"Mokhtar Ebrahim can you help me 🙁 i just start doing a program and then i can’t combine my code in the gui i made in Qtdesigner to python. my application is PhoneBook with add search sort delete and update. im using list
Hi,
You can write your code as we did in the tutorial above.
Define your functions and call them on click events or so.
Regards,
from tkinter import *
from tkinter import messagebox
class login:
def __init__(self, root):
self.root = root
self.root.title(“login System”)
self.root.geometry(“1199×600+100+50″)
##############################Login frame##########################
Frame_Login = Frame(self.root, bg=”violet”)
Frame_Login.place(x=150, y=150, height=340, width=500)
Title = Label(Frame_Login, text=”login Here”, font=(“Impact”, 35, “Bold”), fg=”#d77337″, bg=”violet”).place(x=90, y=30)
desc = Label(Frame_Login, text=”Accountant Employee Login Area”, font=(“Goudy old style”, 15, “Bold”),fg=”#d25d17″, bg=”violet”).place(x=90, y=100)
lbl_user = Label(Frame_Login, text=”Username”, font=(“Goudy old style”, 15, “Bold”),fg=”Grey”, bg=”violet”).place(x=90, y=140)
self.txt_user=Entry(Frame_Login, font=(“Times New Roman”, 15))
self.txt_user.place(x=90, y=170, width=350, height=35)
lbl_pass = Label(Frame_Login, text=”Password”, font=(“Goudy old style”, 15, “Bold”), fg=”Grey”,bg=”violet”).place(x=90, y=210)
self.txt_pass = Entry(Frame_Login, font=(“Times New Roman”, 15))
self.txt_pass.place(x=90, y=240, width=350, height=35)
Forget_btn =Button(Frame_Login, text=”Forget Password?”, bg=”white”, fg=”#d77337″, bd=0, font=(“times new roman”, 12)).place(x=90, y=280)
Login_btn =Button(self.root, text=”Login”, fg=”white”, bg=”#d77337″, bd=0, font=(“times new roman”, 20)).place(x=300, y=470, width=180, height=40)
def login(self):
if self.txt_pass.get()==”” or self.txt_user.get()==””:
messagebox.showerror(“Error”, “All fields are required”, parent= self.root)
root = Tk()
#obj = login(root)
root.mainloop
i cant see the window
You did not specify the login class which is your window to open.
Follow the first example in this tutorial and you will be able to show the window.
Regards,
I should want to add that I have put on my desktop the old icon of PyScripter: I like it more 😉
How do you find Pyscripter in coding?