The Unconventional Guide to Colors In Python
If you have been programming in Python, chances are high that you have encountered at least one library that offers functionalities dealing with representation and customization of colors.
From image processing to data visualization to web application development, you will find the use of colors everywhere.
In fact, most of the modern deep neural networks used for the state of the art computer vision tasks are trained on the spatial distribution of color information of the pixels in images.
In this tutorial, we will look at a few of those libraries, and understand how colors are described and modified programmatically.
Color representation in Computers
Before we look at a specific Python library, let us first understand how colors are generally represented in computer programs.
There are many popular color models used to describe a color, such as the RGB, CMYK, HSV, HSL, etc.
The RGB color model is most commonly used in programming languages.
The RGB color model
In the RGB color model, any color can be generated by mixing 3 primary colors, namely, Red, Green, and Blue.
In this model, a color can be described by specifying a group of 3 numeric values (typically ranging from 0 to 255),
each specifying the intensity of Red, Green, and Blue colors present in a given color.
These 3 colors are also sometimes referred to as ‘channels’ or ‘bands’.
In most programming languages, including Python, the information about these 3 bands is generally specified in one of the 2 ways – a tuple of RGB values or HEX codes.
In the first notation, we represent a color as a tuple of 3 values, corresponding to the Red, Green, and Blue intensities, in that order (unless specified otherwise). The numbers in this representation, ranging from 0 to 255, are represented in decimal (base 10) encoding.
In some cases, these numbers are also scaled-down and specified in the range of 0 to 1.
HEX code, on the other hand, is a way of representing the same information (RGB values) in hexadecimal (base 16) encoding.
For example, the RGB representation of the red color as a tuple is (255, 0, 0), whereas the HEX code equivalent of the same will be ‘#FF0000′(FF = 16*15 + 15 = 255).
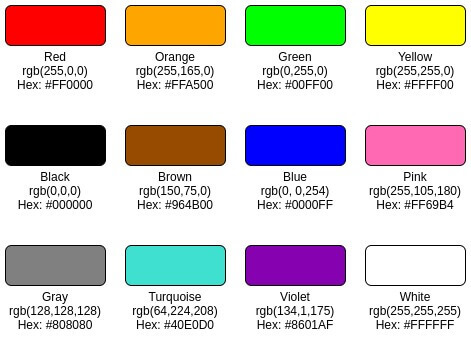
Here are some of the common colors along with their RGB values and the corresponding HEX codes:
Print colored text in the terminal
If you have installed software packages using the command line, you may have encountered special instructions, warnings, or errors being shown in different colored texts on the terminal.
This is just one of the many situations where colored outputs on the terminal are helpful.
Python has libraries that allow us to print outputs in the colors of our choice. We can use these libraries to print colored texts as well as colored blocks by customizing the foreground as well as the background of the text.
Let us look at one such library – termcolor.
from termcolor import colored
print("This is a normal text in terminal")
print(colored("This is a colored text in terminal","red"))
print(colored("This is a colored text with background","red","on_green"))
Output:

The first parameter to the colored method is the text to be printed, followed by the parameters to specify the foreground and background colors of the text.
There are various other libraries such as colored, Colr, etc. that allow us to customize and format the terminal output similarly.
Escape sequences to customize text color in Python
In the previous section, we used a library to specify the foreground and the background colors of the text.
We can also customize the appearance of texts in the terminal by directly appending special escape sequence characters in the output string.
These escape sequences are called “ANSI sequence codes.”
They are used to give special commands to the terminal to alter the appearance of the text being printed on them.
In this section, we will look at a few examples of how we can alter the foreground and background colors of the texts, along with other text formatting options such as bold and underline.
All the ANSI escape codes we use will begin with the sequence '\033[' and end with 'm'.
Let us take a look at an example.
print("\033[0;30;47mHello World")
Output:

Note that we do not need to call any special library to print colored texts in the terminal.
It is just a bunch of characters preceding the text (to be customized) that defines the styling of the text.
The format of the above ANSI code is as follows:
\033[: The beginning of the escape sequence characters
0;: Text style (0 indicates no effect)
30;: Text color (30 represents black)
47;: Background color (47 represents white background)
m: Indicates the end of the code, the styles defined preceding this character will apply to the text following it.
If you look at the previous output, the white background extends beyond the end of the text to the next prompt.
We can avoid this by applying a blank style at the end of the text.
print("\033[0;30;47mHello World\033[0m")
Output:

Let us also look at some text formatting options such as bold, italic, and underline by altering the first numeric character following the beginning of the escape sequence.
The code for bold text is 1, and that of underline is 4. For italic, the code is 3.
print("\033[4;33m This is an underlined yellow text.\033[0m")
print("\033[1;31;46m This is a bold, red text on a cyan background.\033[0m")
Output:

We can also specify colors using their RGB values.
To do that, we must insert special codes, as follows:
\033[38;2;(r);(g);(b)m – for text color
\033[48;2;(r);(g);(b)m – for text background color
Let us combine the two methods to display a text with ‘italic’ style, green (0,255,0) text color and gray (128,128,128) background color;
We will describe the colors using their RGB values.
print("\033[3;38;2;0;255;0;48;2;128;128;128m This is an italic, green text on a gray background.\033[0m")
Output:

Read pixel color from an image in Python
As we discussed earlier, each color can be described using a tuple of 3 values, namely, the R, G, and B values.
An image is composed of a large number of pixels. A pixel is like a biological cell — it is the smallest indivisible area in an image.
In colored images, each pixel is a square-shaped region on an image defined by the same three RGB values that we use to define a color.
These values denote the color of the pixel location on the image.
Since a digital image is rectangular, it is stored in memory as a composition of 3 two-dimensional arrays.
Each of these arrays is of the same size (equal to the size of the image), and they are called the R, G, and B ‘channels’ of the image.
![]()
We can represent an image in Python using NumPy arrays.
As a result, we can access each pixel in an image and fetch their RGB values.
Let us consider the following image of a cat.
![]()
I am curious about the colors of the eyes of this cat, do you also want to find out what color is it?
We can find the color (RGB values) of any location in an image using simple array indexing.
First, we need to read the image and convert it into a NumPy array.
from PIL import Image
import numpy as np
img = Image.open("cat.jpg")
img_arr = np.array(img)
print("type =",type(img_arr))
print("shape =",img_arr.shape)
Output:
![]()
The shape of the array indicates that the image has a height of 480 pixels and a width of 570 pixels.
The third dimension 3 indicates it’s an RGB image.
Now we want to figure out the RGB values of the colors of the left and right eyes of the cat.
We can do that by indexing the image array object. We can index any position in the region of the two eyes.
For the left eye, we will look at the position [250,260], and we will look at the position [244,357] for the right eye.
left_eye_color = img_arr[250,260]
right_eye_color = img_arr[244,357]
print("left eye color = ", left_eye_color)
print("right eye color = ", right_eye_color)
Output:
![]()
The RGB values of the left eye do correspond to a brownish shade of yellow, and the values of the right eye correspond to a bluish shade.
Modifying the pixel color in an image
Now that we know how to access the pixel values at any location in an image, let us look at how we can modify them to paint a new color at these locations.
Let us try inserting a 5×5 blob of black color around the location we had used to access the pixel values of the left eye.
We will use pyplot to do this:
for i in range(248,253):
    for j in range(258,263):
        img_arr[i, j ] = (0,0,0)
import matplotlib.pyplot as plt
fig = plt.figure(figsize=(8,6))
ax = fig.add_subplot(111)
ax.axis("off")
ax.imshow(img_arr)
plt.show()
Output:
![]()
Note the small region in the left eye painted black due to our pixel manipulation step in the for loop.
Detect color in an image using ColorThief
There exists an interesting Python library called ‘colorthief‘ that helps us to identify the most dominant color(s) in an image.
Let us find out the dominant color in this image of a breakfast:

from colorthief import ColorThief
img = ColorThief("breakfast.jpg")
dominant_color = img.get_color()
print("Dominant color =",dominant_color)
Output:

The get_color() method returns the RGB values of the most dominant color in the image.
Let’s plot this color.
#plotting the color
im = np.array(dominant_color).reshape(1,1,3)
fig = plt.figure(figsize=(3,3))
ax = fig.add_subplot(111)
ax.axis("off")
ax.imshow(im)
plt.show()
Output:
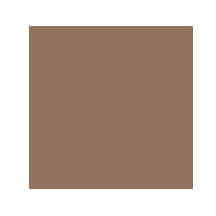
So the most dominant color is a light brown, which may be coming from the table on which breakfast is kept.
Similarly, the ColorThief library also helps us to find the color palette or the ‘top n colors’ in an image.
palette = img.get_palette(color_count=5)
palette = np.array(palette)
print(palette)
Output:
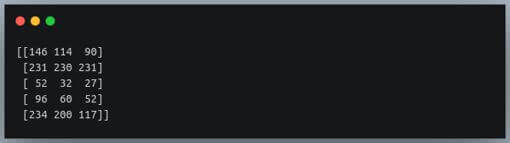
The get_palette method takes the parameter color_count, which indicates how many top colors we want to find in the image.
Let us plot these 5 images, and relate it to the above image of the breakfast.
from skimage import io
ind = np.linspace(0,4,5, dtype=int).reshape(1,5)
fig = plt.figure(figsize=(8,2))
ax = fig.add_subplot(111)
ax.imshow(palette[ind])
ax.set_yticks([])
plt.show()
Output:
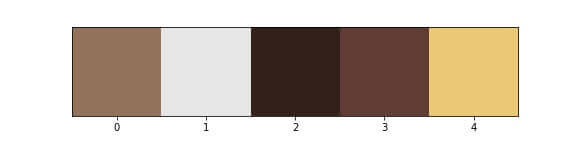
Now we have the plates, berries, and juice as well represented in the palette.
Python colour module
Python’s colour module is a simple, yet powerful library to store, convert and manipulate colors.
Using this library, we can store colors in one of the many formats, namely, RGB, hex codes, HSL, etc.
We can also convert colors from one format to the other.
Let us look at an example.
from colour import Color
c1 = Color("red")
print("c1 represents",c1)
rgb = c1.rgb
rgb = [int(x*255) for  x in rgb]
print("rgb for c1 =",rgb)
print("hex for c1 =",c1.hex_l)
print("hsl for c1 =",c1.hsl)
Output:
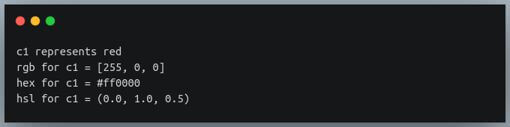
The attribute .rgb returns a decimal value in the range (0,1), hence we are converting them to the range (0,255) by multiplying each of them with 255.
Let us now look at steps to modify an existing color.
c1.green = 1.0
print("c1 now represents the color",c1)
#Manipulating HSL channels
print("hsl for c1 currently is",c1.hsl)
c1.hue = 0.666666667
print("c1 is now", c1)
Output:
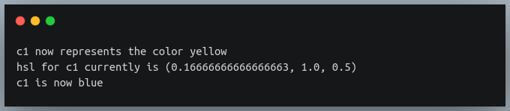
Notice how, by manipulating the green channel value, we turned the existing color that was red into yellow.
Then again, by modifying its hue value, we converted the yellow color into blue.
Creating a gradient color using the colour module
A gradient is a continuous colormap or a continuous progression between two or more colors.
We can generate a gradient between two colors using the colour module.
Let us create a gradient between red and green colors.
c1 = Color("red")
c2 = Color("green")
gradient = list(c1.range_to(c2, 10))
print(gradient)
Output:
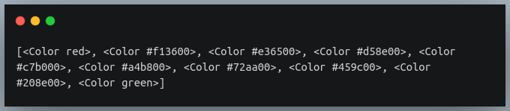
This generates a range of 10 colors between red and green.
Let us try to visualize them.
grad_rgb = [x.rgb for x in gradient]
grad_rgb_255 = [list(map(lambda x: int(x*255), i)) for i in grad_rgb]
palette = np.array(grad_rgb_255)
import matplotlib.pyplot as plt
ind = np.linspace(0,9,10, dtype=int).reshape(1,10)
fig = plt.figure(figsize=(8,2))
ax = fig.add_subplot(111)
ax.imshow(palette[ind])
ax.axis("off")
plt.show()
Output:
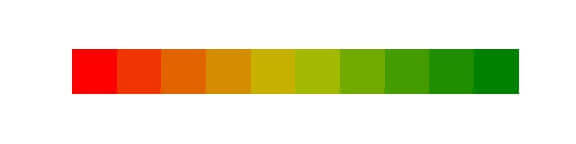
That shows the gradient between red and green, defined by 10 successive colors.
We could make the gradient even smoother by generating an increasing number of colors in between.
Conclusion
In this tutorial, we learned how to represent, manipulate colors, and how to apply them to texts and other objects using various libraries in Python.
We began by understanding some of the ways of representing colors in computer programs.
Then we looked at how to modify the appearance of the texts in the terminal.
First, we did this by using Python libraries and then by appending escape sequence characters to our output strings.
We explored ways to read and update pixel colors at any location in an image.
We also looked at a library to find the most dominant colors in an image.
Next, we looked at the ‘colour’ module for representing colors and updating the existing ones.
We finally ended it by generating a gradient of colors using the color module and then plotting the same with the help of the matplotlib library.
Machine Learning Engineer & Software Developer working on challenging problems in Computer Vision at IITK Research and Development center.
3+ years of coding experience in Python, 1+ years of experience in Data Science and Machine Learning.
Skills: C++, OpenCV, Pytorch, Darknet, Pandas, ReactJS, Django.