PyQt5 tutorial – Python GUI programming examples
PyQt5 is one of the most used modules in building GUI apps in Python, and that’s due to its simplicity as you will see.
Another great feature that encourages developers to use PyQt5 is the PyQt5 designer, which makes it so easy to develop complex GUI apps in a short time. You just drag your widgets to build your form.
In this PyQt5 tutorial, I will use Python 3.x on Windows 10.
Sound great! So let’s get started and install PyQt5 at first, then we will see how to develop GUI apps with examples.
- 1 Install PyQt5
- 2 Install PyQt5 designer
- 3 How to use PyQt5 designer
- 4 Difference between QDialog, QMainWindow, and QWidget
- 5 Load .ui VS convert .ui to .py
- 6 QLabel widget
- 7 QLineEdit widget
- 8 QPushButton Widget
- 9 Visual signal/slot editor
- 10 How to emit a signal
- 11 QComboBox widget
- 12 QTableWidget
- 13 Packaging Python files (Converting to executable)
Install PyQt5
PyQt5 has two versions, the commercial version and the free GPL version that we will use in this tutorial.
To install PyQt5, you have two ways:
- Using pip
- Using source
Using pip
To install PyQt5 using pip, run the following command:
$ pip3 install PyQt5
To ensure the successful installation, run the following Python code:
import PyQt5
If no errors appeared, that means you have successfully installed PyQt5, but if you got errors, you might be using an unsupported version of Python.
Install PyQt5 designer
There are two ways to build GUI apps using PyQt5:
- Design widgets by code.
- Using PyQt5 designer.
In this PyQt5 tutorial, we will use the PyQt5 designer, which makes it so easy to finish a lot of work in a matter of seconds.
PyQt5 designer comes with PyQt5 tools. To install it, you need to install PyQt5 tools.
$ pip3 install PyQt5-tools
Where is PyQt5 designer?
After successful installation, you can find the PyQt5 designer on this location:
C:\Program Files\Python36\Lib\site-packages\pyqt5-tools\
Also, If you installed Python for your current user only, you will find the PyQt5 designer on this location:
C:\Users\LikeGeeks\AppData\Local\Programs\Python\Python36-32\Lib\site-packages\ pyqt5-tools\
You can make a shortcut for it instead of going into this location every time you want to run the PyQt5 designer.
How to use PyQt5 designer
Open designer.exe, and you will see a dialog asking you about the form template you want.
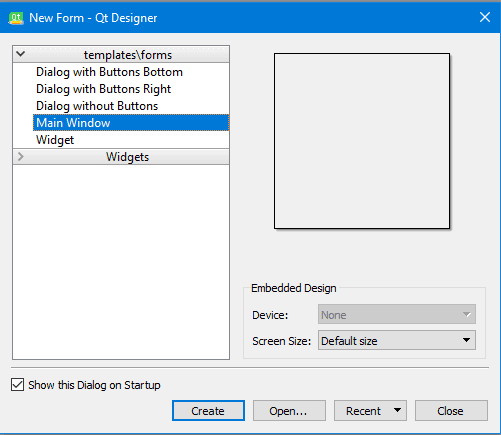
There are five templates available:
- Dialog with Buttons Bottom: Creates a form with OK and Cancel buttons at the bottom right of the form.
- Dialog with Buttons Right: Creates a form with OK and Cancel buttons at the top right of the form.
- Dialog without Buttons: Creates a blank form.
- Main Window: Creates a window with a menu bar and a toolbar and inherited from QMainWindow.
- Widget: Creates a widget that is inherited from QWidget class, unlike the Dialogs templates which inherit from QDialog class.
So we have three types of templates, what is the difference?
Difference between QDialog, QMainWindow, and QWidget
- QWidget is the base class for all GUI elements in the PyQt5.
- QDialog is used for asking the user about something, like asking the user to accept or reject something or maybe asking for input and is based on QWidget.
- QMainWindow is the bigger template where you can place your toolbar, menu bar, status bar, and other widgets. It doesn’t have a built-in allowance for buttons like those in QDialog.
Load .ui VS convert .ui to .py
In this tutorial, we will use the PyQt5 designer, but before we dig deeper, let’s see how we will use the generated design from the PyQt5 designer.
Open PyQt5 designer, and choose Main Window template and click create button.
Then from the file menu, click save; PyQt5 designer will export your form into an XML file with .ui extension. Now, to use this design, you have two ways:
- Loading the .ui file in your Python code.
- Converting the .ui file to a .py file using pyuic5.
Loading the .ui file in your Python code
To load the .ui file in your Python code, you can use the loadUI() function from uic like this:
from PyQt5 import QtWidgets, uic
import sys
app = QtWidgets.QApplication([])
win = uic.loadUi("mydesign.ui") #specify the location of your .ui file
win.show()
sys.exit(app.exec())
If you run your code, you should see a window with nothing but a label.
That means the ui file loaded successfully!
We used sys.exit(app.exec()) instead of using app.exec() directly to send the correct status code to the parent process or the calling process.
If you used app.exec() directly, the application would send zero, which means success, and this will happen even if the application crashed.
Converting the .ui file to a .py file using pyuic5
Now, let’s try the second way by converting the .ui file to a Python code:
$ pyuic5 mydesign.ui -o mydesign.py
Yes! That creates a new file with the name mydesign.py. Now, let’s import that file to show our window.
The pyuic5 stands for Python user interface converter version 5.
from PyQt5 import QtWidgets
from mydesign import Ui_MainWindow  # importing our generated file
import sys
class mywindow(QtWidgets.QMainWindow):
def __init__(self):
    super(mywindow, self).__init__()
    self.ui = Ui_MainWindow()
    self.ui.setupUi(self)
app = QtWidgets.QApplication([])
application = mywindow()
application.show()
sys.exit(app.exec())
If you run this code, you should see the same window again as we did in the first method.
The benefit of using the second method is the auto-completion that the IDE will provide since all of your widgets are imported, while the first method you just load the .ui file, and you need to be aware of your widgets names.
Another benefit of using the second method is the speed since you don’t need XML parsing to load the UI.
Now, let’s get our hands dirty and play with the PyQt5 widgets.
QLabel widget
To add a QLabel widget to your form, do the following:
- Open PyQt5 designer and choose the Main Window template.
- Drag a label widget from the widget box on the left.
Now, save the design to a .ui file and convert it to a .py file and let’s play with the label widget using code.
Change Font
To change the QLabel font, use the setFont() method and pass a QFont to it like this:
from PyQt5 import QtWidgets, QtGui
from mydesign import Ui_MainWindow
import sys
class mywindow(QtWidgets.QMainWindow):
    def __init__(self):
        super(mywindow, self).__init__()
        self.ui = Ui_MainWindow()
        self.ui.setupUi(self)
        self.ui.label.setFont(QtGui.QFont('SansSerif', 30)) # change font type and size
app = QtWidgets.QApplication([])
application = mywindow()
application.show()
sys.exit(app.exec())
If you run this code, you will note that the label does not appear correctly because the size is smaller than the font size we used. So we need to set the label size.
Change size
To change the QLabel size, you need to set its geometry using the setGeometry() method like this:
from PyQt5 import QtWidgets, QtGui,QtCore
from mydesign import Ui_MainWindow
import sys
class mywindow(QtWidgets.QMainWindow):
    def __init__(self):
        super(mywindow, self).__init__()
        self.ui = Ui_MainWindow()
        self.ui.setupUi(self)
        self.ui.label.setFont(QtGui.QFont('SansSerif', 30))
        self.ui.label.setGeometry(QtCore.QRect(10, 10, 200, 200)) # change label geometry
app = QtWidgets.QApplication([])
application = mywindow()
application.show()
sys.exit(app.exec())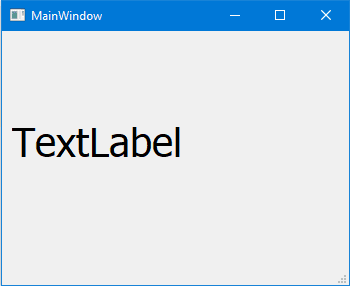
Change text
To change the QLabel text, you can use the setText() method like this:
from PyQt5 import QtWidgets, QtGui,QtCore
from mydesign import Ui_MainWindow
import sys
class mywindow(QtWidgets.QMainWindow):
    def __init__(self):
        super(mywindow, self).__init__()
        self.ui = Ui_MainWindow()
        self.ui.setupUi(self)
        self.ui.label.setFont(QtGui.QFont('SansSerif', 30))
        self.ui.label.setGeometry(QtCore.QRect(10, 10, 200, 200))
        self.ui.label.setText("LikeGeeks") #change label text
app = QtWidgets.QApplication([])
application = mywindow()
application.show()
sys.exit(app.exec())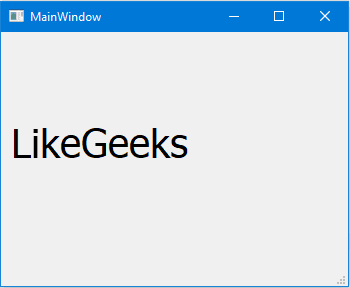
That was easy! Let’s check some other widgets.
QLineEdit widget
The QLineEdit is an editable place where you can accept input from the user. LineEdit has many methods to work with.
I will create a new design with the PyQt5 designer, and I’ll add six QLineEdit widgets, and I’ll export it to .py file.
Now, let’s see some QLineEdit methods:
from PyQt5 import QtWidgets,QtCore
from mydesign import Ui_MainWindow
import sys
class mywindow(QtWidgets.QMainWindow):
    def __init__(self):
        super(mywindow, self).__init__()
        self.ui = Ui_MainWindow()
        self.ui.setupUi(self)
        self.ui.lineEdit.setText("Welcome to LikeGeeks website") #change text
        self.ui.lineEdit_2.setMaxLength(10) #set maximum length
        self.ui.lineEdit_3.setEchoMode(QtWidgets.QLineEdit.Password) # password input
        self.ui.lineEdit_4.setReadOnly(True) #QLineEdit readonly
        self.ui.lineEdit_5.setStyleSheet("color: rgb(28, 43, 255);") #change text color
        self.ui.lineEdit_6.setStyleSheet("background-color: rgb(28, 43, 255);") #change QLineEdit background color
app = QtWidgets.QApplication([])
application = mywindow()
application.show()
sys.exit(app.exec())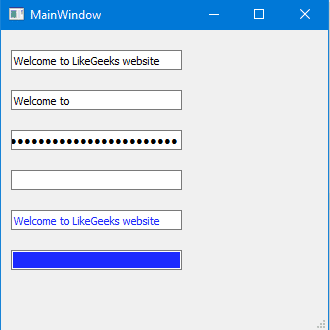
The first QlineEdit, we changed the text using the setText() method.
The second QlineEdit, we set the maximum allowed characters to 10, so nothing more is accepted.
The third QlineEdit, we set it to password mode, so all your input appears as asterisks.
The fourth QlineEdit, we set it to read-only so you can’t edit its content.
The fifth QlineEdit, we changed the font color using the setStyleSheet() method, and we insert the color like web pages CSS values.
The sixth QlineEdit, we changed the background color using the setStyleSheet() method.
The setStyleSheet() method
You can use the setStyleSheet() method with all PyQt5 widgets to change the style.
You can change the following using setStyleSheet() method:
- Font type and size
- Text Color
- Background color
- Border color
- Border top color
- Border bottom color
- Border right color
- Border left color
- Selection color
- Selection background color
These are the most important values you can pass to the setStyleSheet() method.
QPushButton Widget
Most of your Python programs will have this QPushButton widget. You click the button, and some code runs.
If you have a programming background, you may hear about event handling where you interact with a widget, and a function is executed.
The idea in PyQt5 is the same, but the definitions are a bit different.
So when you click a QPushButton, a signal is emitted. The signal name in this case is called clicked().
To bind the emitted signal with a slot, you need to use the connect() method as you will see now.
This event handling process continues to work until you close your form or main widget.
Let’s build a form with a QLabel and a QPushButton and export it to a .py file.
Now, We will connect the clicked() signal with a slot using connect() method like this:
self.ui.pushButton.clicked.connect(self.btnClicked)
The btnClicked here is the slot or the function that will run when you click the QPushButton.
So your code will be like this:
from PyQt5 import QtWidgets
from mydesign import Ui_MainWindow
import sys
class mywindow(QtWidgets.QMainWindow):
    def __init__(self):
        super(mywindow, self).__init__()
        self.ui = Ui_MainWindow()
        self.ui.setupUi(self)
        self.ui.pushButton.clicked.connect(self.btnClicked) # connecting the clicked signal with btnClicked slot
    def btnClicked(self):
        self.ui.label.setText("Button Clicked")
app = QtWidgets.QApplication([])
application = mywindow()
application.show()
sys.exit(app.exec())
Awesome!
Visual signal/slot editor
We saw how to connect the widget signal to a slot using the connect() method, but this is not the only way.
There are some predefined slots for each widget. You can connect a signal to any predefined slot without coding in the PyQt5 designer.
Drag a QPushButton and a QLineEdit on your form.
Press F4 and drag the mouse from the QPushButton and release it on the top of the QLineEdit.
The signal/slot editor will show up.
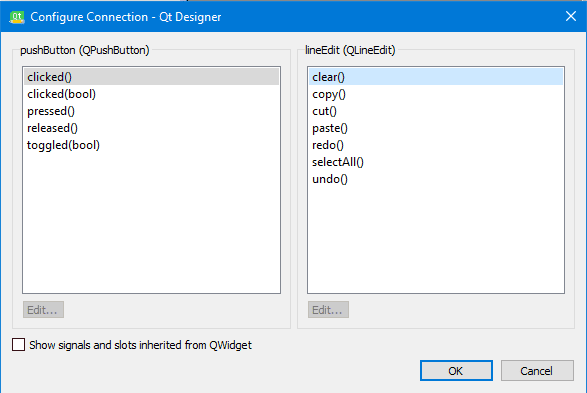
On the left, the predefined signals while on the right the predefined slots. Let’s say that we want to connect the clicked() signal with the clear slot.
Choose the clicked from the left and choose clear from the right and click OK.
After finishing your signal/slot connections, you can escape from this mode by pressing ESC or F3.
Now, if you run this form and click the QPushButton, any text on the QLineEdit will be cleared. You can edit or delete this connection from the signal/slot editor panel.
How to emit a signal
We saw how signals and slots work. All signals we worked with are predefined for us.
What about emitting our custom signal?
Very easy! You can do that by using the pyqtSignal class as follows:
- Define your event with type pyqtSignal.
- Call emit() method at the place you want your event to be fired.
Let’s say we have a nut class, and we want to fire the cracked signal to be emitted when we crack it.
from PyQt5.QtCore import pyqtSignal,QObject
class nut(QObject):
    cracked = pyqtSignal()
    def __init__(self):
        QObject.__init__(self)
    def crack(self):
        self.cracked.emit()
How to use a signal
Now, let’s make our example more practical by instantiating an instance of the nut class and emitting the cracked signal:
def crackit():
    print("hazelnut cracked!")
hazelnut = nut()
hazelnut.cracked.connect(crackit) # connecting the cracked signal with crackit slot
hazelnut.crack()
The cracked signal was successfully emitted.
Signal (event) overriding
Sometimes, you need to override the default behavior for a specific signal or event.
Let’s see a practical example for that. If you want to close the main window when the user presses a specific key, you can override the keyPressEvent inside your main window like this:
 def keyPressEvent(self, e):
        if e.key() == Qt.Key_F12:
            self.close()
Now, if the user presses the F12 key, the main window will be closed.
Here we override the keypress signal of the main window and close the window.
QComboBox widget
Instead of letting the user enter values in a QLineEdit or any editable widget, we can use a QCombobBox widget to give the user a list of choices to select from.
Let’s drag a combo box to our form and take a look at some of its methods.
If you run the app now, you will note that the QComboBox is empty. To add items to the QComboBox, use the addItem() method:
from PyQt5 import QtWidgets
from mydesign import Ui_MainWindow
import sys
class mywindow(QtWidgets.QMainWindow):
    def __init__(self):
        super(mywindow, self).__init__()
        self.ui = Ui_MainWindow()
        self.ui.setupUi(self)
        self.ui.comboBox.addItem("First item") #add item
        self.ui.comboBox.addItem("Second item")
app = QtWidgets.QApplication([])
application = mywindow()
application.show()
sys.exit(app.exec())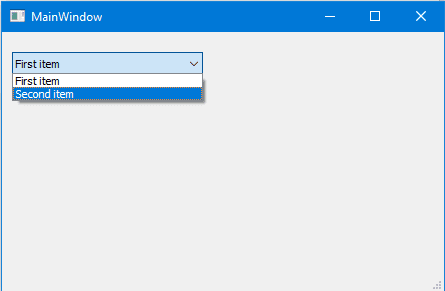
Get all items
There is no direct method to get all items from a QComboBox, but you can use a for loop to do that.
for i in range(self.ui.comboBox.count()):
    print(self.ui.comboBox.itemText(i))
Select an item
To select an item from the QComboBox, you have two methods:
self.ui.comboBox.setCurrentIndex(1) #select by index which is zero-based
self.ui.comboBox.setCurrentText("Second item") #select by text
Note that when selecting an item by text, make sure you write the correct text otherwise. The QComboBox will stay at the first element.
QTableWidget
If you want to view your database data in a tabular format, PyQt5 provides the QTableWidget for that.
QTableWidget consists of cells; each cell is an instance of QTableWidgetItem class.
Let’s design a form that contains a QTableWidget and a QPushButton. Drag a table widget and a push button from the widget box. Then save and convert the design to use it.
To add rows to the QTableWidget, you can use the setRowCount() method.
To add columns to the QTableWidget, you can use the setColumnCount() method.
from PyQt5 import QtWidgets
from mydesign import Ui_MainWindow
import sys
class mywindow(QtWidgets.QMainWindow):
    def __init__(self):
        super(mywindow, self).__init__()
        self.ui = Ui_MainWindow()
        self.ui.setupUi(self)
        self.ui.tableWidget.setColumnCount(2)
        self.ui.tableWidget.setRowCount(4)
app = QtWidgets.QApplication([])
application = mywindow()
application.show()
sys.exit(app.exec())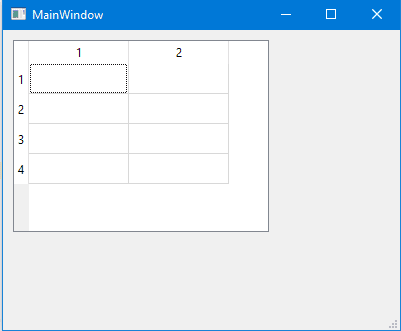
Now you can type text manually inside QTableWidget cells.
Clear QtableWidget content
To clear QTableWidget content, you can use the clear method like this:
def clear():
    self.ui.tableWidget.clear()
    self.ui.pushButton.clicked.connect(clear)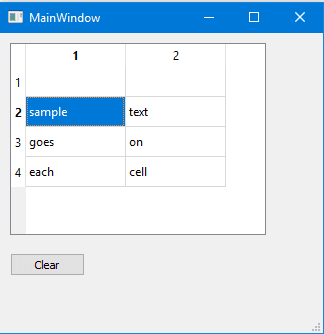
Populate QTableWidget by code
To fill QTableWidget programmatically, you should use the setItem() method for each QTableWidgetItem.
from PyQt5.QtWidgets import QTableWidgetItem
from mydesign import *
import sys
data = []
data.append(('Populating', 'QtableWidget'))
data.append(('With data', 'In Python'))
data.append(('Is easy', 'Job'))
class mywindow(QtWidgets.QMainWindow):
    def __init__(self):
        super().__init__()
        self.ui = Ui_MainWindow()
        self.ui.setupUi(self)
        self.ui.tableWidget.setRowCount(3)
        self.ui.tableWidget.setColumnCount(2)
        row=0
        for tup in data:
            col=0
            for item in tup:
                cellinfo=QTableWidgetItem(item)
                self.ui.tableWidget.setItem(row, col, cellinfo)
                col+=1
            row += 1
app = QtWidgets.QApplication([])
win = mywindow()
win.show()
sys.exit(app.exec())
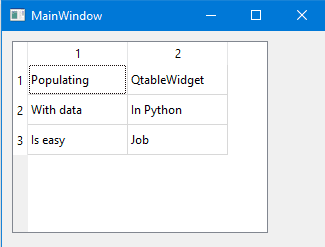
- First, we create a Python list of three tuples.
- Inside the constructor of the main window, we set the rows and columns count.
- Then we iterate over the list and get every tuple on the list to fill the table cells using the setItem() method.
- Finally, we show the main window.
Make QTableWidget not editable (read-only)
You may not like leaving your table cells editable for the user in some cases. Like showing a read-only data and any editing process makes no sense.
To make QTableWidget not editable, you can use setFlags() method to set each QTableWidgetItem not editable.
cellinfo.setFlags(QtCore.Qt.ItemIsSelectable | QtCore.Qt.ItemIsEnabled) #make it not editable
You must set the flags before setting your cell content.
Therefore, your code will be like this:
from PyQt5.QtWidgets import QTableWidgetItem
from mydesign import *
import sys
data = []
data.append(('Populating', 'QtableWidget'))
data.append(('With data', 'In Python'))
data.append(('Is easy', 'Job'))
class mywindow(QtWidgets.QMainWindow):
    def __init__(self):
        super().__init__()
        self.ui = Ui_MainWindow()
        self.ui.setupUi(self)
        self.ui.tableWidget.setRowCount(3)
        self.ui.tableWidget.setColumnCount(2)
        row=0
        for tup in data:
            col=0
            for item in tup:
                cellinfo=QTableWidgetItem(item)
                cellinfo.setFlags(QtCore.Qt.ItemIsSelectable | QtCore.Qt.ItemIsEnabled)  # make cell not editable
                self.ui.tableWidget.setItem(row, col, cellinfo)
                col+=1
            row += 1
app = QtWidgets.QApplication([])
win = mywindow()
win.show()
sys.exit(app.exec())
Now, if you try to edit any cell, you can’t; because the QTableWidgetItem is not editable.
Set QTableWidget column (header) name
Until now, the column names of the QTableWidget are numbers. What about setting the column names to something else.
To set QTableWidget header text, you can use setHorizontalHeaderLabels() method like this:
from PyQt5.QtWidgets import QTableWidgetItem
from mydesign import *
import sys
data = []
data.append(('Populating', 'QtableWidget'))
data.append(('With data', 'In Python'))
data.append(('Is easy', 'Job'))
class mywindow(QtWidgets.QMainWindow):
    def __init__(self):
        super().__init__()
        self.ui = Ui_MainWindow()
        self.ui.setupUi(self)
        self.ui.tableWidget.setRowCount(3)
        self.ui.tableWidget.setColumnCount(2)
        self.ui.tableWidget.setHorizontalHeaderLabels(('Column 1', 'Column 2'))  # set header text
        row=0
        for tup in data:
            col=0
            for item in tup:
                cellinfo=QTableWidgetItem(item)
                self.ui.tableWidget.setItem(row, col, cellinfo)
                col+=1
            row += 1
app = QtWidgets.QApplication([])
win = mywindow()
win.show()
sys.exit(app.exec())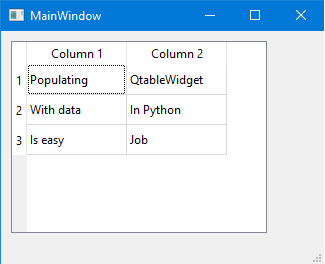
The same way, you can change the row header by using setVerticalHeaderLabels() method:
self.ui.tableWidget.setVerticalHeaderLabels(('Row 1', 'Row 2', 'Row 3'))How to sort QTableWidget
You can make your QTableWidget sortable by using the setSortingEnabled() method.
self.ui.tableWidget.setSortingEnabled(True)
Now, if the user clicks on any column header, he can sort the data in ascending or descending order.
You can use this method before or after populating the QTableWidget with data.
What about sorting the QTableWidget to a specific column only?
You can use the sortByColumn() method and set the column index and the sorting order like this:
from PyQt5.QtWidgets import QTableWidgetItem
from mydesign import *
import sys
data = []
data.append(('Populating', 'QtableWidget'))
data.append(('With data', 'In Python'))
data.append(('Is easy', 'Job'))
class mywindow(QtWidgets.QMainWindow):
    def __init__(self):
        super().__init__()
        self.ui = Ui_MainWindow()
        self.ui.setupUi(self)
        self.ui.tableWidget.setRowCount(3)
        self.ui.tableWidget.setColumnCount(2)
        row=0
        for tup in data:
            col=0
            for item in tup:
                cellinfo=QTableWidgetItem(item)
                self.ui.tableWidget.setItem(row, col, cellinfo)
                col+=1
            row += 1
        self.ui.tableWidget.sortByColumn(0, QtCore.Qt.AscendingOrder)  # sort by the first column
app = QtWidgets.QApplication([])
win = mywindow()
win.show()
sys.exit(app.exec())
Also, you can use the sortItems() method to sort QTableWidget in ascending order by default.
self.ui.tableWidget.sortItems(0)
Or you can specify the sorting order:
self.ui.tableWidget.sortItems(0,QtCore.Qt.DescendingOrder)
Keep in mind that if you want to sort your columns programmatically, you must use the sorting methods after populating the QTableWidget with data otherwise, your data won’t be sorted.
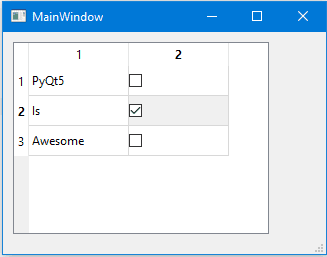
Add QComboBox in QTableWidget
You may need the user to choose a value inside the QTableWidget instead of entering a text.
What about adding a QComboBox inside QTableWidgetItem?
To add a QComboBox inside QTableWidgetItem, you can use the setCellWidget() method:
from PyQt5.QtWidgets import QTableWidgetItem
from mydesign import *
import sys
data = ['PyQt5','Is','Awesome']
class mywindow(QtWidgets.QMainWindow):
        def __init__(self):
            super().__init__()
            self.ui = Ui_MainWindow()
            self.ui.setupUi(self)
            self.ui.tableWidget.setRowCount(3)
            self.ui.tableWidget.setColumnCount(2)
            row=0
            for item in data:
                cellinfo=QTableWidgetItem(item)
                combo = QtWidgets.QComboBox()
                combo.addItem("First item")
                combo.addItem("Second item")
                self.ui.tableWidget.setItem(row, 0, cellinfo)
                self.ui.tableWidget.setCellWidget(row, 1, combo)
                row += 1
app = QtWidgets.QApplication([])
win = mywindow()
win.show()
sys.exit(app.exec())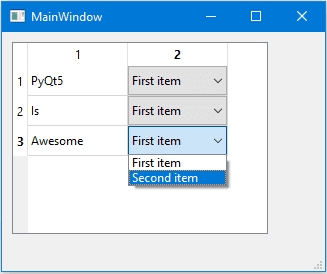
Cool!
Don’t stop your mind from imagination and try to insert different widgets like a QCheckbox or even a QProgressBar.
The above code will be the same except the line where you create the QComboBox; you will add the widget you want.
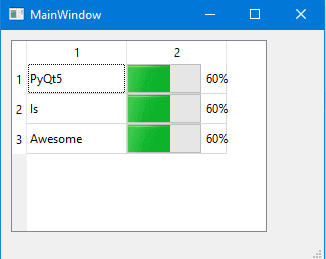
The only limit is your imagination.
Packaging Python files (Converting to executable)
You can convert your Python programs into binary executables using many tools.
For me, I will use pyinstaller, which is capable of packaging or freezing Python code into executable under Windows, Linux, Mac OS X, FreeBSD, and Solaris. All this with full support for 32,64-bit architecture.
The best part about pyinstaller the full support for PyQt5.
Great! First, install pyinstaller:
$ pip3 install pyinstaller
After you installed it, you can convert your Python programs like this:
$ pyinstaller test.py
That will generate the executable on the dist folder on your Python program directory.
As you will be, a lot of dependencies generated beside the executable. What about making it one file?
You can generate one executable file using the one file mode like this:
$ pyinstaller --onefile test.py
Each time you run your executable a console window appears, what about hiding this window?
You can use -w or –noconsole to hide the console window:
$ pyinstaller -w test.py
This option for Windows and Mac OS X only.
Pyinstaller provides a lot of options to pack your app, to list all options, use –help:
$ pyinstaller --help
Mokhtar is the founder of LikeGeeks.com. He is a seasoned technologist and accomplished author, with expertise in Linux system administration and Python development. Since 2010, Mokhtar has built an impressive career, transitioning from system administration to Python development in 2015. His work spans large corporations to freelance clients around the globe. Alongside his technical work, Mokhtar has authored some insightful books in his field. Known for his innovative solutions, meticulous attention to detail, and high-quality work, Mokhtar continually seeks new challenges within the dynamic field of technology.
Great and simple tuto. Thank you very much !
You are welcome! Thanks!
Hi Mokhtar, first of all I would like to thanks for such a nice tutorial on QT5. You explained all the concepts very well and it helped me a lot. I am facing some trouble on “QWT_WIDGETS” like “QwtThermo”. My machine is running Ubuntu 18.04 and python3.6. If i use any QWT_WIDGETS in my design it throws error like
“from qwt_thermo import QwtThermo
ModuleNotFoundError: No module named ‘qwt_thermo’ ” . I am able to convert .ui to .py via pyuic5. On designer form these widgets works fine and when i run python3 code it shows error.
I don’t know whats wrong with it. Rest Widgets and Input tools are working fine…
Thanks!
Hello Sandeep,
It looks you have a problem in installing QWT, make sure that you followed the correct steps for compiling the downloaded source code.
Regarding running the converted py code, can you share the error so I can help?
Regards,
Hello Mokhtar,
Thank you for your tutorial. It’s really helpful.
I have an gui with an QTextEdit and I would like to change the text of it by another class, but somehow it doesn’t work. Is there a good way to manage that?
Something like:
mywindow.ui.QTextEdit.append('text')Thanks!
Hello,
You can change the text from another class by passing your QMainWindow object to your class and set the text as you want.
myobj.ui.lineEdit.setText("You text goes here") #myobj is a reference to your QMainWindowRegards,
Sweet, thank you very much for sharing this concise tutorial. Very helpful. Kudos and Godspeed!
You are welcome! Thank you very much for the kind words!
That keeps me doing my best.
Very helpful! I am starting my first GUI application and I didn’t know where to start because QT is such a complicated beast. Thanks!
Great to hear that!
Thank you very much for the kind words. Appreciate it.
Hello Sandeep,
thanks to you for your support I am able to import a MainWindow converted from .ui to .py.
In Qt Designer I can choose MainWindow, Dialog or Widget.
Could you write a similar python code also from a QDialog and a QWidget ui converted in .py?
I’ve just replaced the main keyword (MainDialog–>Dialog/Form…) but the following error appears:
the show() method seems NOT present…
Many thanks
Best Regards
Can you share the code snippet that has the error so we can help?
Hey,this is a very useful tutorial.Thank you
I have a question,i prefer importing the ui file using the following code:
from PyQt5 import QtWidgets, uic
import sys
app = QtWidgets.QApplication([])
win = uic.loadUi("mydesign.ui") #specify the location of your .ui file
win.show()
sys.exit(app.exec())
The above code i have learnt from you.How do i code the rest of the python code in this especially referring to controls such as line Edit,labels and push buttons e.t.c ?Can you give an example maybe?
The file called mydesign.ui must include all of your controls that you will deal with.
The tutorial demonstrates every step to design and work with controls step by step.
Thanks for this tutorial. I followed your tutorial and created small gui with push button that will open a file browser to select picture and add image to label box. if i convert .ui to .py and add button functions right on that converted .py file ( in my case testgui.py), everything works, but if i create new.py file (in my case main.py) and run, push button doesn’t work.
Can you please help me on this?
Thanks
testui.py file (this is the one that i converted from ui. to .py
# -*- coding: utf-8 -*- # Form implementation generated from reading ui file 'C:\pyqt5\test\testgui.ui' # # Created by: PyQt5 UI code generator 5.11.3 # # WARNING! All changes made in this file will be lost! from PyQt5 import QtCore, QtGui, QtWidgets class Ui_MainWindow(object): def setupUi(self, MainWindow): MainWindow.setObjectName("MainWindow") MainWindow.resize(423, 322) self.centralwidget = QtWidgets.QWidget(MainWindow) self.centralwidget.setObjectName("centralwidget") self.pushButton = QtWidgets.QPushButton(self.centralwidget) self.pushButton.setGeometry(QtCore.QRect(70, 110, 111, 31)) self.pushButton.setObjectName("pushButton") self.label = QtWidgets.QLabel(self.centralwidget) self.label.setGeometry(QtCore.QRect(210, 110, 191, 161)) self.label.setFrameShape(QtWidgets.QFrame.Box) self.label.setObjectName("label") MainWindow.setCentralWidget(self.centralwidget) self.menubar = QtWidgets.QMenuBar(MainWindow) self.menubar.setGeometry(QtCore.QRect(0, 0, 423, 22)) self.menubar.setObjectName("menubar") MainWindow.setMenuBar(self.menubar) self.statusbar = QtWidgets.QStatusBar(MainWindow) self.statusbar.setObjectName("statusbar") MainWindow.setStatusBar(self.statusbar) self.retranslateUi(MainWindow) QtCore.QMetaObject.connectSlotsByName(MainWindow) def retranslateUi(self, MainWindow): _translate = QtCore.QCoreApplication.translate MainWindow.setWindowTitle(_translate("MainWindow", "MainWindow")) self.pushButton.setText(_translate("MainWindow", "PushButton")) self.label.setText(_translate("MainWindow", "TextLabel")) if __name__ == "__main__": import sys app = QtWidgets.QApplication(sys.argv) MainWindow = QtWidgets.QMainWindow() ui = Ui_MainWindow() ui.setupUi(MainWindow) MainWindow.show() sys.exit(app.exec_()) main.py file (this is the one that i am trying to open the window and press the button) from PyQt5 import QtCore, QtGui, QtWidgets from testgui import Ui_MainWindow class AppWindow(Ui_MainWindow): def __init__(self): super(AppWindow, self).__init__() self.setupUi(self) self.pushButton.clicked.connect(self.setImage) def setImage(self): fileName, _ = QtWidgets.QFileDialog.getOpenFileName(None, "Select Image", "","Image Files (*.png *.jpg *.jpeg *.bmp)") if fileName: pixmap = QtGui.QPixmap(fileName) pixmap = pixmap.scaled(self.label.width(), self.label.height(), QtCore.Qt.KeepAspectRatio) self.label.setPixmap(pixmap) self.label.setAlignment(QtCore.Qt.AlignCenter) if __name__ == "__main__": import sys app = QtWidgets.QApplication(sys.argv) MainWindow = QtWidgets.QMainWindow() ui = Ui_MainWindow() ui.setupUi(MainWindow) MainWindow.show() sys.exit(app.exec_())Think i figured it out. i changed following code:
With this: (not sure if this the right way but is working)
tnxxxxxxxxxxxxx
You’re welcome!
Hi Mokhtar Ebrahim!
Thanks a lot for your tuto, great work!!!
Please I am new in python and my question is: After generating the .py code from the .ui one, where exactly do I have to put my connect function?
Here is my .py code:
# -*- coding: utf-8 -*-

# Form implementation generated from reading ui file 'test.ui'
#
# Created by: PyQt5 UI code generator 5.9.2
#
# WARNING! All changes made in this file will be lost!

from PyQt5 import QtCore, QtGui, QtWidgets

class Ui_MainWindow(object):
    def setupUi(self, MainWindow):
        MainWindow.setObjectName("MainWindow")
        MainWindow.resize(600, 344)
        self.centralwidget = QtWidgets.QWidget(MainWindow)
        self.centralwidget.setObjectName("centralwidget")
        self.prix1 = QtWidgets.QTextEdit(self.centralwidget)
        self.prix1.setGeometry(QtCore.QRect(290, 60, 111, 31))
        self.prix1.setObjectName("prix1")
        self.prix2 = QtWidgets.QTextEdit(self.centralwidget)
        self.prix2.setGeometry(QtCore.QRect(290, 120, 111, 31))
        self.prix2.setObjectName("prix2")
        self.label = QtWidgets.QLabel(self.centralwidget)
        self.label.setGeometry(QtCore.QRect(210, 60, 71, 21))
        font = QtGui.QFont()
        font.setPointSize(19)
        self.label.setFont(font)
        self.label.setObjectName("label")
        self.label_2 = QtWidgets.QLabel(self.centralwidget)
        self.label_2.setGeometry(QtCore.QRect(210, 120, 71, 21))
        font = QtGui.QFont()
        font.setPointSize(18)
        self.label_2.setFont(font)
        self.label_2.setObjectName("label_2")
        self.addition = QtWidgets.QPushButton(self.centralwidget)
        self.addition.setGeometry(QtCore.QRect(300, 200, 91, 31))
        font = QtGui.QFont()
        font.setPointSize(12)
        self.addition.setFont(font)
        self.addition.setObjectName("addition")
        self.resultat = QtWidgets.QTextEdit(self.centralwidget)
        self.resultat.setGeometry(QtCore.QRect(290, 240, 111, 31))
        self.resultat.setObjectName("resultat")
        self.label_3 = QtWidgets.QLabel(self.centralwidget)
        self.label_3.setGeometry(QtCore.QRect(190, 240, 91, 31))
        font = QtGui.QFont()
        font.setPointSize(17)
        self.label_3.setFont(font)
        self.label_3.setObjectName("label_3")
        self.label_4 = QtWidgets.QLabel(self.centralwidget)
        self.label_4.setGeometry(QtCore.QRect(20, 10, 201, 31))
        font = QtGui.QFont()
        font.setPointSize(28)
        self.label_4.setFont(font)
        self.label_4.setObjectName("label_4")
        MainWindow.setCentralWidget(self.centralwidget)
        self.menubar = QtWidgets.QMenuBar(MainWindow)
        self.menubar.setGeometry(QtCore.QRect(0, 0, 600, 21))
        self.menubar.setObjectName("menubar")
        MainWindow.setMenuBar(self.menubar)
        self.statusbar = QtWidgets.QStatusBar(MainWindow)
        self.statusbar.setObjectName("statusbar")
        MainWindow.setStatusBar(self.statusbar)

        self.retranslateUi(MainWindow)
        QtCore.QMetaObject.connectSlotsByName(MainWindow)

    def retranslateUi(self, MainWindow):
        _translate = QtCore.QCoreApplication.translate
        MainWindow.setWindowTitle(_translate("MainWindow", "MainWindow"))
        self.label.setText(_translate("MainWindow", "Prix 1"))
        self.label_2.setText(_translate("MainWindow", "Prix 2"))
        self.addition.setText(_translate("MainWindow", "Addition"))
        self.label_3.setText(_translate("MainWindow", "Résultat"))
        self.label_4.setText(_translate("MainWindow", "Calculator"))


if __name__ == "__main__":
    import sys
    app = QtWidgets.QApplication(sys.argv)
    MainWindow = QtWidgets.QMainWindow()
    ui = Ui_MainWindow()
    ui.setupUi(MainWindow)
    MainWindow.show()
    sys.exit(app.exec_())
#-------------------------------- end
the script I write to add is :
def __init__(self):
            Ui_MainWindow.__init__(self)
            self.setupUi(self)
            self.addition.clicked.connect(self.f_addition)

        def f_addition(self):
            p1 = int(self.prix1.toPlaintext())
            p2 = int(self.prix2.toPlainText())
            self.resultat.setText(str(p1+p2))
Thanks!
Thank you very much!
Regarding the connect method, I see that you already using it to bind the click event of a button.
Nice guide! However, editing through the converted code is not recommended right? The modified code will be lost in case of redesign and reconversion to .py file. It’s best to load .py file into another file mainly for the editing purpose.
Thanks a lot!
Editing the generated code is not recommended. You can save the .ui file for later updates and regenerate the .py again after you change what you want.
However, you can edit the generated .py if you know what you are doing.
First of all, this is the best tutorial ever.
I don’t know how to show a dialog (second window) in my app, what is the best way to do that?
Thank you very much!
Regarding showing a dialog, you can create a QDialog object and call it from your Window.
This is a simple example I’ve made for you to show you how it works:
import sys from PyQt4.QtGui import * from PyQt4.QtCore import * def window(): app = QApplication(sys.argv) w = QWidget() b = QPushButton(w) b.setText("Click Here") b.move(50,50) b.clicked.connect(opendialog) w.setWindowTitle("LikeGeeks") w.show() sys.exit(app.exec_()) def opendialog(): d = QDialog() b1 = QPushButton("Done",d) b1.move(50,50) d.setWindowTitle("Dialog Title") d.setWindowModality(Qt.ApplicationModal) d.exec_() if __name__ == '__main__': window()Many thanks, the best tutorial around PyQt ever!
You’re welcome! Thank you.