PyQt5 drawing tutorial (Painting APIs)
In this tutorial, we will learn how to draw vector graphics in PyQt5. In Python, the PyQt5 module is the easiest module you can use for drawing purposes as you will see.
Before we start, let’s create a window using PyQt5, where we will draw our graphics.
- 1 Create a PyQt5 window
- 2 Draw a circle
- 3 Draw a Filled Circle
- 4 Draw Half Circle
- 5 Draw a Line
- 6 Draw Horizontal Line
- 7 Draw an arrow
- 8 Draw an arc
- 9 Draw a curve
- 10 Draw an Ellipse
- 11 Draw a rectangle
- 12 Draw a filled Rectangle
- 13 Draw a Triangle
- 14 Draw a filled Triangle
- 15 Draw a Gradient
- 16 Draw a Polygon
- 17 Draw on Image
Create a PyQt5 window
To create the window, import the following modules:
from PyQt5 import QtGui
from PyQt5.QtWidgets import QApplication, QMainWindow
import sys
Now create the Window class, which provides a window for our application where we can have a menu bar, status bar, graphics, etc.
Inside this class, we will have two methods; the first method is a constructor, which is automatically called when the object of the class is created.
The second method called InitWindow, it sets the parameters we defined in our constructor, for example, the title of our application window, length, and width, etc.
class Window(QMainWindow):
    def __init__(self):
        super().__init__()
        self.title = "PyQt5 Drawing Tutorial"
        self.top= 150
        self.left= 150
        self.width = 500
        self.height = 500
        self.InitWindow()
    def InitWindow(self):
        self.setWindowTitle(self.title)
        self.setGeometry(self.top, self.left, self.width, self.height)
        self.show()
In the constructor, the parameters are initialized and in the InitWindow() method, the parameters are applied to the window using setGeometry() function.
Now the main steps: Create an instance of QApplication and object of Window class then execute the window.
App = QApplication(sys.argv)
window = Window()
sys.exit(App.exec())
Our window is now ready, and we can create graphics easily:
Draw a circle
To draw graphics, import the following modules:
from PyQt5.QtGui import QPainter, QBrush, QPen
from PyQt5.QtCore import Qt
The QPainter provides various functions to draw basic shapes. For example, lines, rectangles, etc. The QBrush modules provide colors, textures, etc. for a shape. The QPen defines the working of QPainter that is how should QPainter design or style a shape.
- The first step is to define the method where all painting work will be done; the method is paintEvent():
def paintEvent(self, event):
- Create a painter object:
painter = QPainter(self)
- Now set the QPen for the painter and assign the color and style to the line for the circle:
painter.setPen(QPen(Qt.green, 8, Qt.DashLine))
The value 8 is the width of the circle line.
- Draw the circle using drawEllipse(x_axis, y_axis, width, height). We called the drawEllipse() method using the painter object we created in step 2. Define the x and y-axis where the circle will be placed in the window and the size (height and width).
painter.drawEllipse(40, 40, 400, 400)
The output will be as follows:
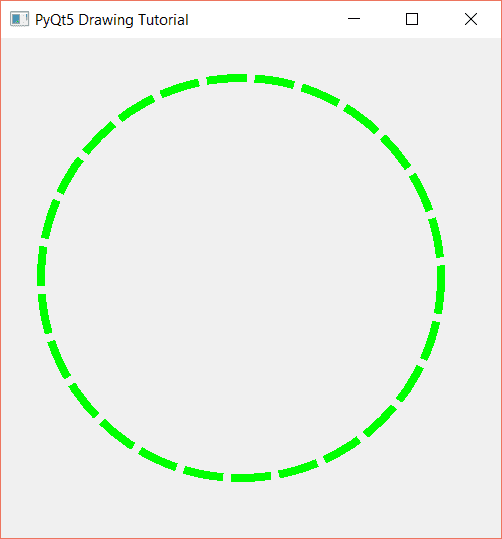
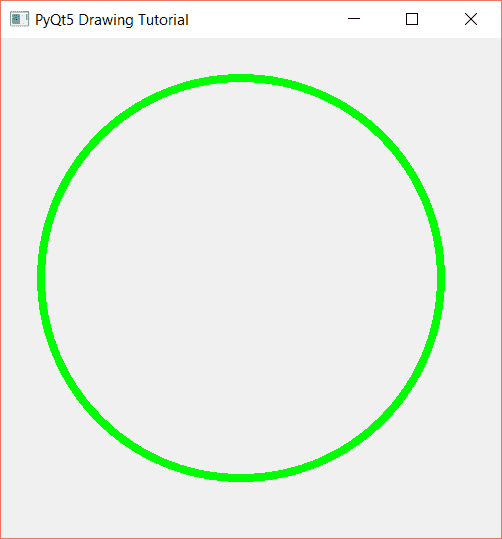
In this example, we have used the DashLine as line style; we can also use SolidLine to create a solid lined continuous circle as follows:
painter.setPen(QPen(Qt.green, 8, Qt.SolidLine))
We can have the following line styles:
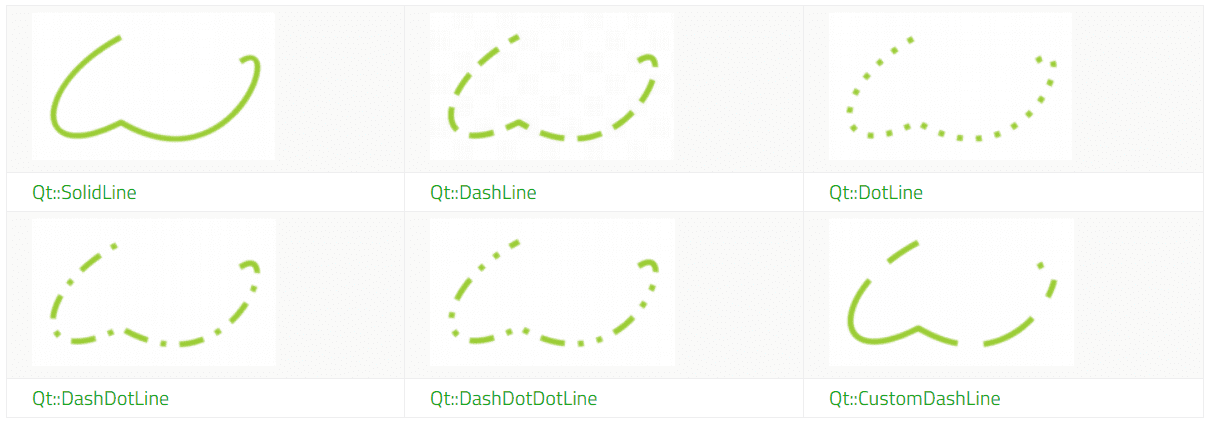
This image is extracted from the QPen Official Documentation.
Draw a Filled Circle
You can draw a filled circle by using the QBrush. Set the color of the pattern and pattern style.
- Set the brush as we set the pen in the last section using the painter object:
painter.setBrush(QBrush(Qt.red, Qt.SolidPattern))
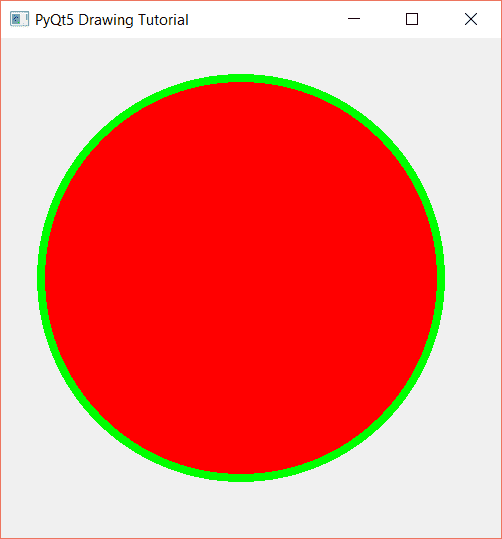
The entire painterEvent function will be like this:
def paintEvent(self, event):
        painter = QPainter(self)
        painter.setPen(QPen(Qt.green,  8, Qt.SolidLine))
        painter.setBrush(QBrush(Qt.red, Qt.SolidPattern))
        painter.drawEllipse(40, 40, 400, 400)
There are many other patterns that we can use, for example, the cross pattern:
painter.setBrush(QBrush(Qt.red, Qt.CrossPattern))
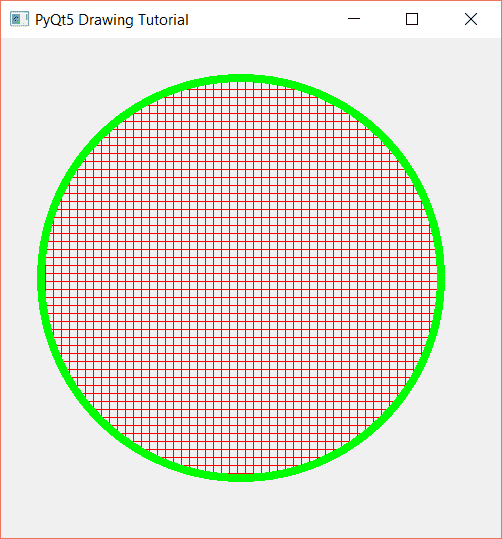
You can have the following patterns to fill in the circle or any other shape:
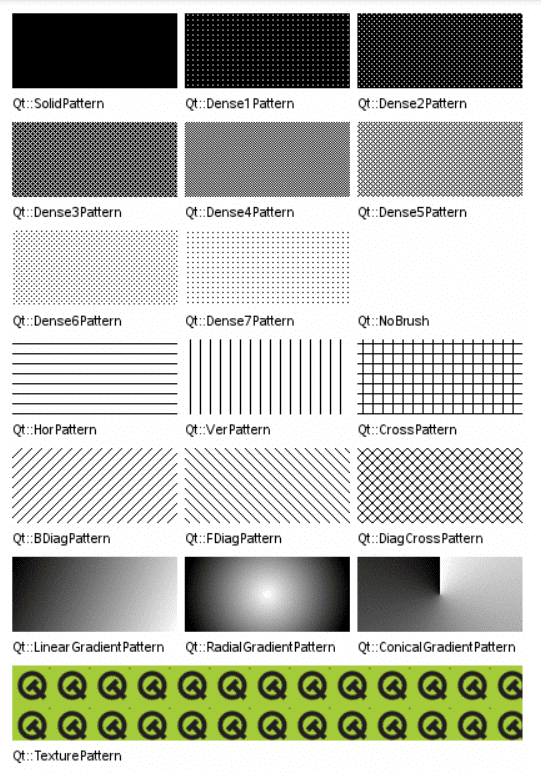
This image is extracted from the QBrush Official Document.
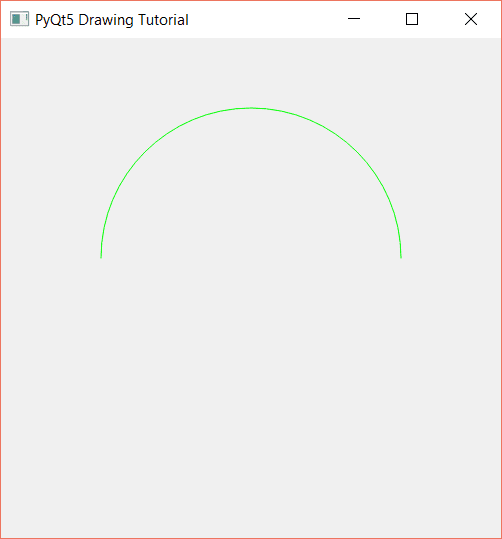
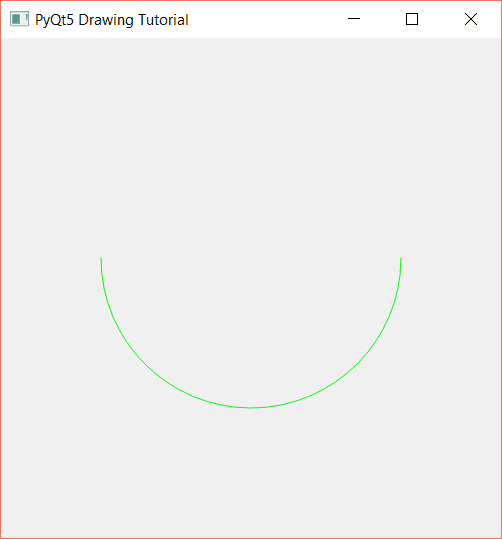
Draw Half Circle
To create a half circle, we will be using the drawArc() method. Follow the steps below:
- Create a painter object:
painter = QPainter()
- Now activate the painter by using the begin() method:
painter.begin(self)
- Now use the setRenderHint() method, which returns the flag specifying the rendering hints set for the painter object.
painter.setRenderHint(QPainter.Antialiasing)
- Set the pen for the arc:
painter.setPen(QtCore.Qt.green)
- Set the brush:
painter.setBrush(QtCore.Qt.white)
- Finally, draw the arc:
painter.drawArc(100, 70, 300, 300, 0 * 16, 180 * 16)
The first two parameters are the x and y-axis respectively. Then we have the width and size of the arc, then the start angle. In the end, we have defined the span angle.
The result will be like this:
You can create a half-circle upside down by changing the 180 degrees to -180 degrees:
painter.drawArc(100, 70, 300, 300, 0 * 16, -180 * 16)
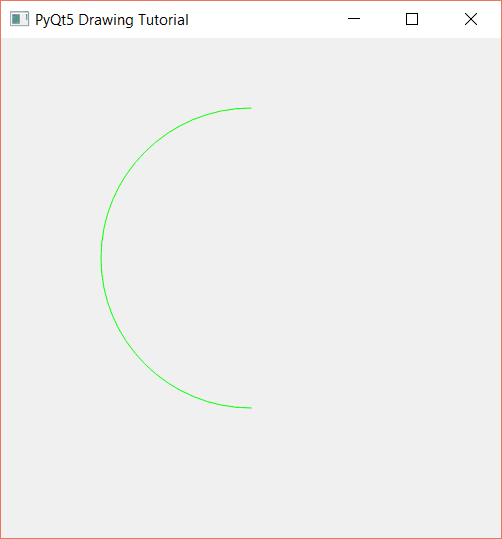
To create a vertical half-circle:
painter.drawArc(100, 70, 300, 300, 90 * 16, 180 * 16)
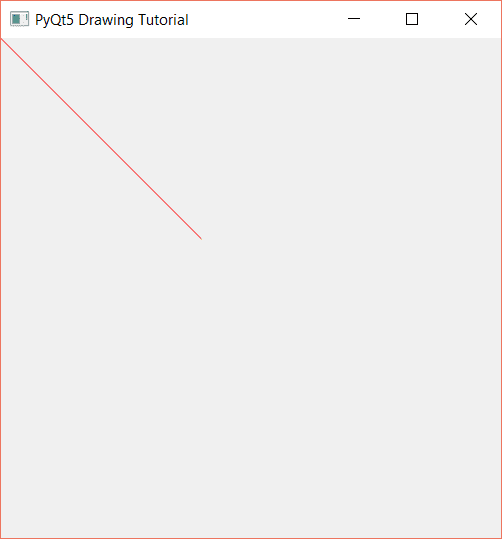
Draw a Line
In this section, you will learn to draw a line. You can draw a line using the drawLine() function.
The drawLine() function draws a line from point a to point b. Follow the steps below:
- Create a painter object:
painter = QPainter()
- Now activate the painter by using the begin() method:
painter.begin(self)
- Now use the setRenderHint() method, which returns the flag specifying the rendering hints set for the painter object.
painter.setRenderHint(QPainter.Antialiasing)
- Set the pen for the line:
painter.setPen(QtCore.Qt.red)
- Set the brush:
painter.setBrush(QtCore.Qt.white)
- Finally, draw the line:
painter.drawLine(0, 0, 200, 200)
The result will be like this:
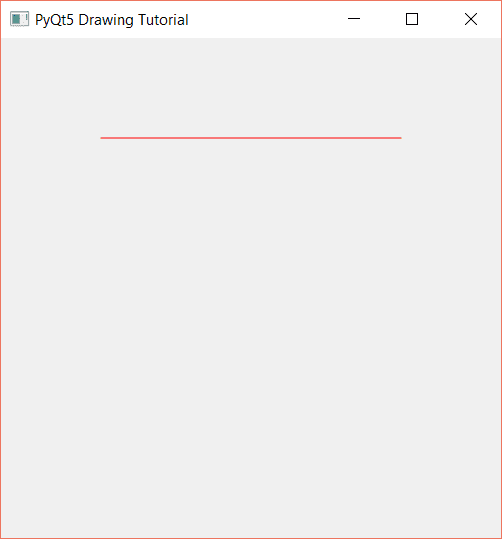
Draw Horizontal Line
You can draw a horizontal line by using the drawLine() method. Consider the following code:
def paintEvent(self, event):
        painter = QPainter()
        painter.begin(self)
        painter.setRenderHint(QPainter.Antialiasing)
        painter.setPen(QtCore.Qt.red)
        painter.setBrush(QtCore.Qt.white)
        painter.drawLine(400, 100, 100, 100)
The code is the same as the previous section, but you have to organize the points in the drawLine() function to get a horizontal line. This will generate the following result:
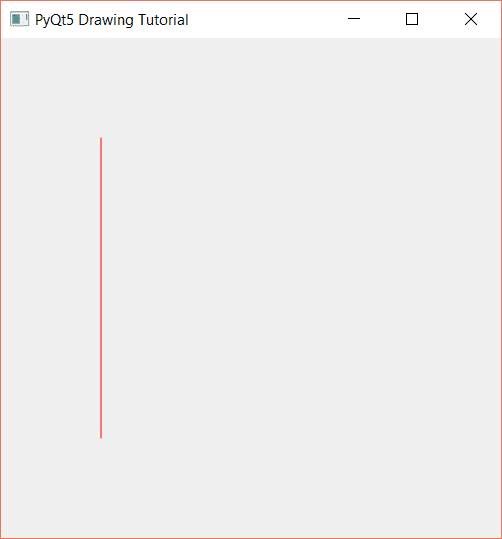
Similarly, we can create a vertical line by using the following points in the drawLine() function:
painter.drawLine(100, 100, 100, 400)
The result will be like this:
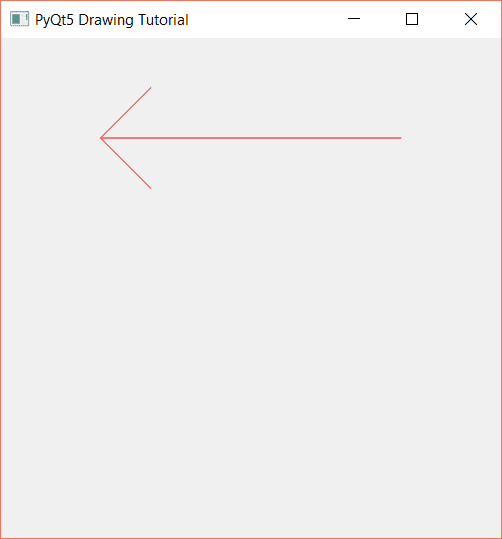
Draw an arrow
To draw an arrow, one will be a horizontal line and the remaining two lines for the head of the arrow. We can draw these lines using the drawLine() function. Consider the code below:
    def paintEvent(self, event):
        painter = QPainter()
        painter.begin(self)
        painter.setRenderHint(QPainter.Antialiasing)
        painter.setPen(QtCore.Qt.red)
        painter.setBrush(QtCore.Qt.white)
        painter.drawLine(400, 100, 100, 100)
        painter.drawLine(150, 150, 100, 100)
        painter.drawLine(150, 50, 100, 100)
The first drawLine() function is for the horizontal line, the second function creates the lower part of the arrowhead, and the third function creates the upper part of the arrowhead.
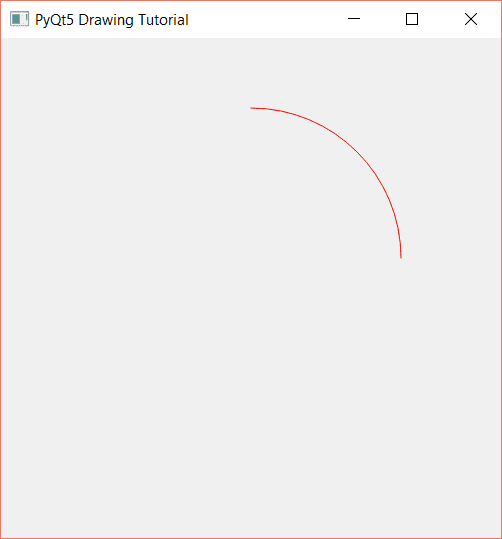
Draw an arc
You can draw an arc using the drawArc() method. The syntax of the drawArc() function is as follows:
drawArc(x_axis, y_axis, width, length, startAngle, spanAngle)
In the following example, we will be creating an arc from 0 degrees to 90 degrees:
def paintEvent(self, event):
        painter = QPainter()
        painter.begin(self)
        painter.setRenderHint(QPainter.Antialiasing)
        painter.setPen(QtCore.Qt.red)
        painter.setBrush(QtCore.Qt.white)
        painter.drawArc(100, 70, 300, 300, 0 * 16, 90 * 16)
This will create an arc like the following:
Draw a curve
To draw a curve, you should use the QPainterPath module.
First of all, import the module:
from PyQt5.QtGui import QPainterPath
Create a QPainter and a QPainterPath object inside the paintEvent() method:
painter = QPainter()
path = QPainterPath()
Repeat the old steps of activating the painter, rendering hints for painter objects, and setting the pen and brush:
painter.begin(self)
painter.setRenderHint(QPainter.Antialiasing)
painter.setPen(QtCore.Qt.red)
painter.setBrush(QtCore.Qt.red)
Use the moveTo() function of the QPainterPath module to move to x and y-axis in the window:
path.moveTo(40, 40)
Use the cubicTo() of the QPainterPath function, which creates a curve between the current position and the endpoint (x, y).
path.cubicTo(40, 40, 150, 250, 250, 40)
Finally, use the drawPath() method and pass the path object to draw the curve.
The output will be like this:

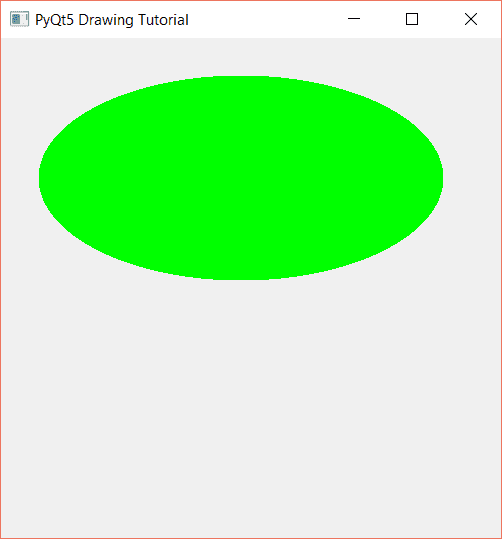
Draw an Ellipse
You can draw an ellipse using the drawEllipse() function like we did when drawing the circle. Just change the points accordingly, and you will get the ellipse. Consider the following code:
    def paintEvent(self, event):
        painter = QPainter(self)
        painter.setPen(QPen(Qt.green,  5, Qt.SolidLine))
        painter.setBrush(QBrush(Qt.green, Qt.SolidPattern))
        painter.drawEllipse(40, 40, 400, 200)
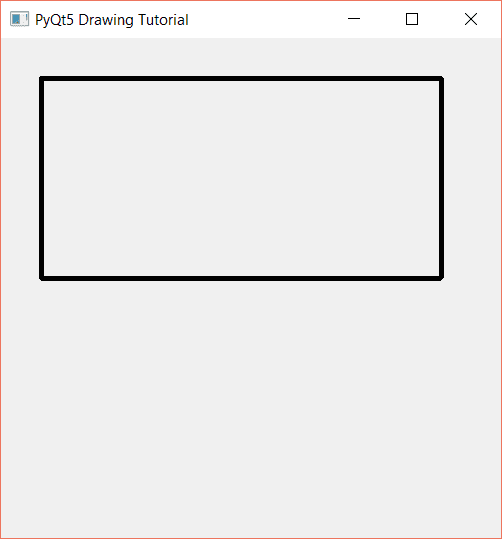
Draw a rectangle
To draw a rectangle, we will use the drawRect() method of the QPainter module.
First of all, create the QPainter object in the paintEvent function:
def paintEvent(self, event):
        painter = QPainter(self)
        painter.setPen(QPen(Qt.black,  5, Qt.SolidLine))
        painter.drawRect(40, 40, 400, 200)
After the painter object, we used the setPen() method to set the color of the rectangle and the line style, which is a solid line in our example.
Then just use the drawRect() method to draw the rectangle on the window. The above code will generate the following result:
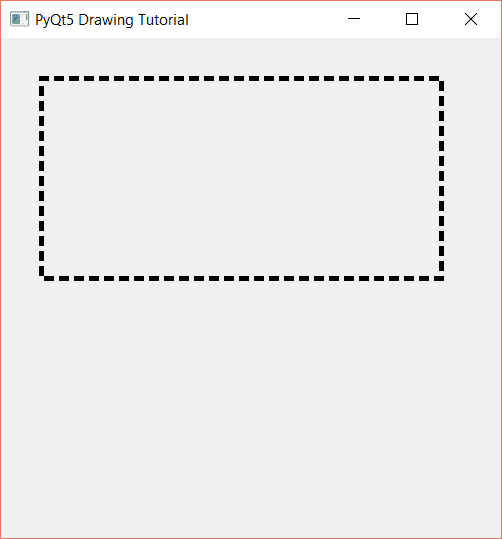
We can use other line styles, for example, DotLine, which will be as follows:
painter.setPen(QPen(Qt.black, 5, Qt.DotLine))
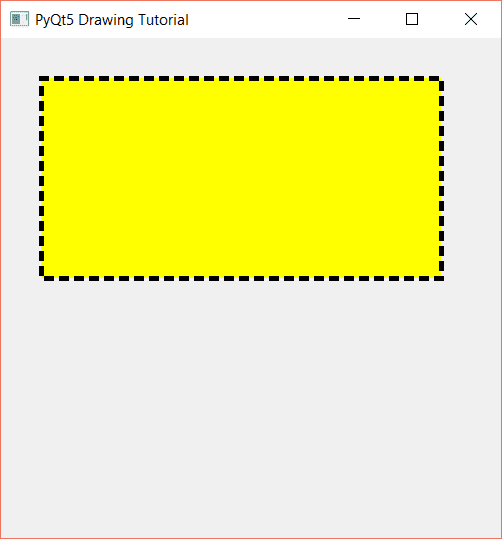
Draw a filled Rectangle
You can draw a filled rectangle by using the setBrush() function as follows:
def paintEvent(self, event):
        painter = QPainter(self)
        painter.setPen(QPen(Qt.black,  5, Qt.DotLine))
        painter.setBrush(QBrush(Qt.yellow, Qt.SolidPattern))
        painter.drawRect(40, 40, 400, 200)
The output will be as follows:
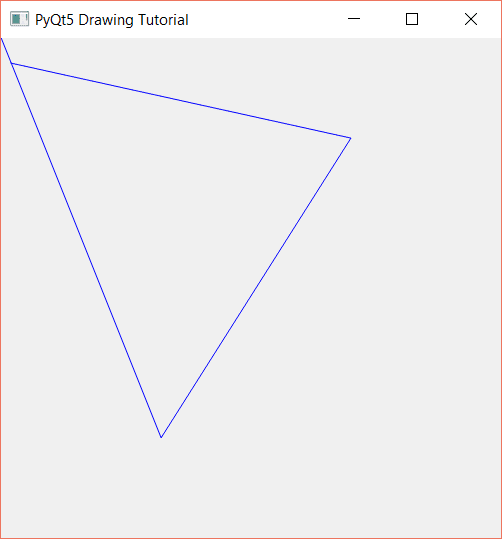
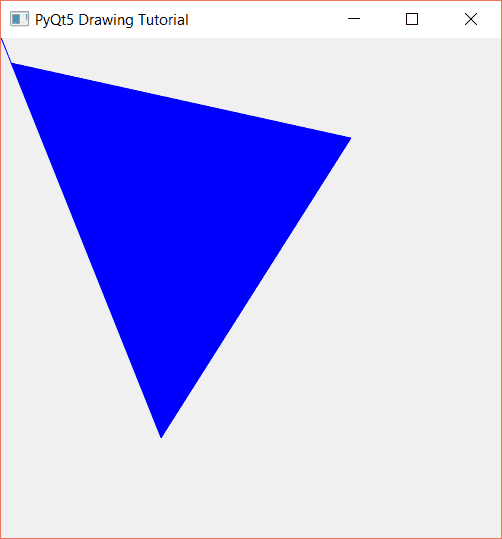
Draw a Triangle
To draw a triangle, you can use the lineTo() function of the QPainterPath module.
Consider the code below:
    def paintEvent(self, event):
        painter = QPainter()
        path = QPainterPath()
        painter.begin(self)
        painter.setRenderHint(QPainter.Antialiasing)
        painter.setPen(QtCore.Qt.blue)
        path.lineTo(160, 400)
        path.lineTo(350, 100)
        path.lineTo(10, 25)
        painter.drawPath(path)
In the above code, we create objects of the respective classes/ modules. Then activate the painter and render the hints. Then set the pen (pen color).
At last, we use three lineTo() functions on different points to create three lines so that they are joined together as below:
Draw a filled Triangle
You can use the setBrush() method to draw a filled triangle as follows:
painter.setBrush(QtCore.Qt.blue)
The output will be like the following:
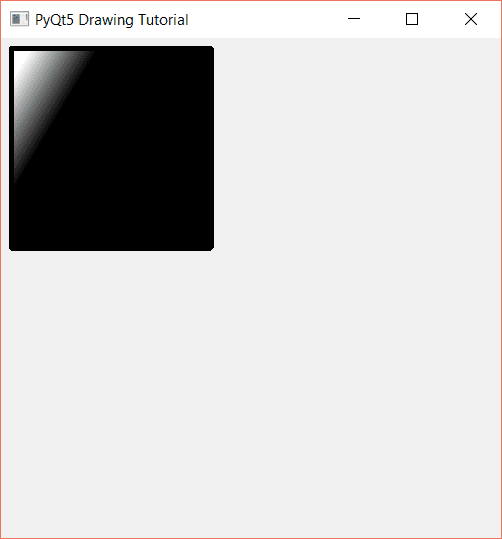
Draw a Gradient
We will use the LinearGradient, and for this, we will import the QLinearGradient module.
from PyQt5.QtGui import QLinearGradient
    def paintEvent(self, event):
        painter = QPainter()
        painter.setPen(QPen(Qt.black,  5, Qt.SolidLine))
        grad = QLinearGradient(80, 40, 30, 10)
        painter.setBrush(QBrush(grad))
        painter.drawRect(10, 10, 200, 200)
We have created a gradient object and passed the values to the QLinearGradient module. Next, we have passed values for the color to the QLinearGradient module, and in the end, we set our brush with the gradient object.
The output will be like this:
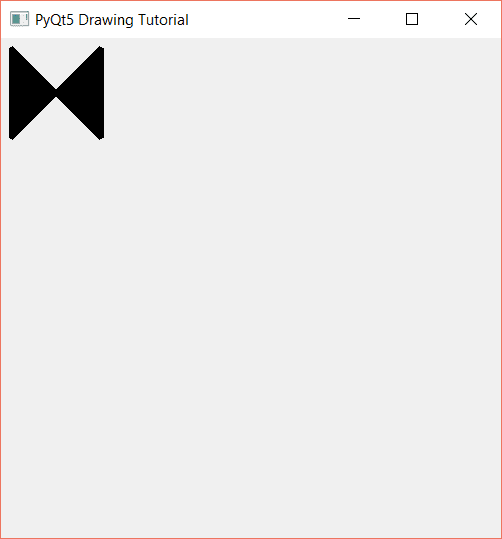
Draw a Polygon
To draw a polygon, you can use the QPolygon method of the QPolygon module. First, you have to import the QPoint from QtCore and QPolygon from QtGui as in the code below:
from PyQt5.QtGui import QPolygon
from PyQt5.QtCore import QPoint
In the code below, we declared an array of points and passed them to the QPolygon() method and used the drawPolygon() method to draw a polygon.
    def paintEvent(self, event):
        painter = QPainter()
        painter.setPen(QPen(Qt.black,  5, Qt.SolidLine))
        painter.setBrush(QBrush(Qt.black, Qt.SolidPattern))
        points = [
            QPoint(10,10),
            QPoint(10,100),
            QPoint(100,10),
            QPoint(100,100)
            ]
        poly = QPolygon(points)
        painter.drawPolygon(poly)
The output is as below:
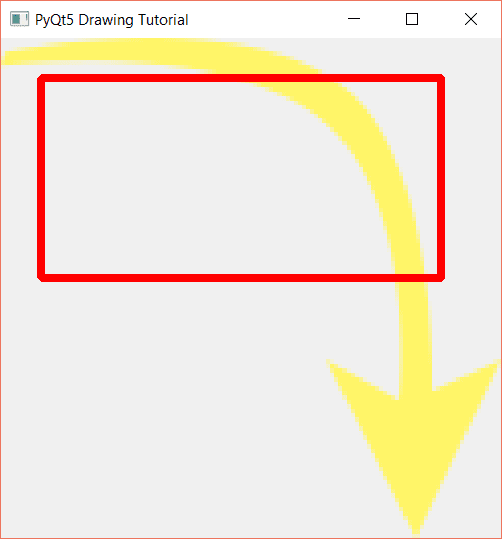
Draw on Image
For this, we have imported everything from the QtWidgets, QtGui, and QtCore modules as below:
from PyQt5.QtWidgets import *
from PyQt5.QtGui import *
from PyQt5.QtCore import *
Now the paintEvent method:
- Create a QPainter object.
- Then to import the image, we have created an object of the QPixmap and passed the link to the image. Our image looks like this:

- Now we have to display the image on the window; we used the drawPixmap().
- Set the pen (the line color and line style for rectangle).
- Draw the rectangle using drawLine(), and it will be drawn on top of the image.
    def paintEvent(self, event):
        painter = QPainter(self)
        pic = QPixmap("Shape_1.png")
        painter.drawPixmap(self.rect(), pic)
        painter.setPen(QPen(Qt.red, 8))
        painter.drawRect(40, 40, 400, 200)
The output is as follows:
Drawing vector images is very simple in PyQt5. I hope you find the tutorial useful.
Thank you.
Ayesha Tariq is a full stack software engineer, web developer, and blockchain developer enthusiast. She has extensive knowledge of C/C++, Java, Kotlin, Python, and various others.
Good
Thanks.
Gran tutorial amigo, encantado de leerte , saludos desde Lima-Perú.