15 Linux ping command examples for network diagnostics
Thanks to Linux, we have access to many tools that facilitate networking administration & diagnostics. In this sense, the Linux ping command is one of the most useful tools for sysadmins and network administrators.
Its basic function is to determine if one host of the network is reachable or not. However, in this post, we will address other more advanced capabilities of the Linux Ping command.
- 1 What is the use of the ping command?
- 2 How does ping command work?
- 3 Can I ping with a proxy?
- 4 Ping IPv6 protocol
- 5 Ping a specific port
- 6 Ping with time
- 7 Ping all the hosts on a given subnet
- 8 How to end a ping?
- 9 Where does ping command located on Linux?
- 10 Check latency using the ping command
- 11 Find the ideal MTU
- 12 Ping on layer 2 (using arping)
- 13 Ping a hostname
- 14 Ping route (using traceroute)
- 15 Run Command if ping fails
- 16 Set the ping packet size
- 17 Disable the ping command
- 18 Conclusion
What is the use of the ping command?
The ping command is one of the most basic tools for working with networks. Its purpose is to diagnose network connection errors.
In this way, it is possible to know if a network node has lost connectivity. On the other hand, it is also useful to perform other diagnostic tasks such as the following:
- Measure the time taken by two network nodes to communicate.
- We will also be able to identify the IP address of a specific host. We can use this feature on both the Internet and in a private network.
- The ping command can be used in a bash script to perform automatic checks with network nodes.
- It allows knowing if there is a connection with specific equipment.
As you can see, it is a necessary command for the administration of networks and servers.
How does ping command work?
In Linux, the functioning of the ping command is quite simple to explain. The command sends a series of small packets to a specific node.
You can test this node using either the IP address or the hostname. Then, after you send the packet, the command verifies and measures the time it takes to receive a response from the destination node.
As you may expect, the response time may be affected due to conditions such as the geographical location between the connection points or any piece of the hardware used between the two nodes.
For example, in wired private networks, the command will get better times than with a network with multiple routers or bridges.
However, the information that the command will generate will judge whether the network is in good or bad condition.
The syntax of the command is as follows:
ping [options] [destination]
Some of the most useful and used options of the ping command are the following:
- -c: With this option, you can specify how many packets to send.
- -s: This option allows you to change the default size of the packets.
- -v: verbose mode.
- -w: Specifies a time in seconds that the execution of the command will end. No matter how many packets the command has sent or received.
- -i: With this option, you can specify the network interface to use.
The destination node can be specified by an IP address or a hostname.
Can I ping with a proxy?
A proxy is a server or application that acts as an intermediary for the connection between two points on a network. It is the man in the middle who makes the request directly to another node.
The problem is that the Ping command requires a direct network connection between the nodes.
Therefore, the Ping command generally cannot function properly if there is a proxy behind it.
A possible solution is that many websites offer the Ping command service. On the other hand, for some tasks of the ping command, it is possible to use the curl command. Also, you can use a VPN so that it will hide your IP.
However, in some Linux distributions, this command is not installed by default. First, verify it and then install it if it is not installed.
Ping IPv6 protocol
Normally, when using the Ping command, we use IP addresses with the IPv4 protocol. However, with the advent of the IPv6 protocol, it is increasingly common to notice addresses in this format.
The Linux kernel supports the IPv6 protocol since version 2.2, so all Linux distributions currently support it.
The basic syntax is as follows:
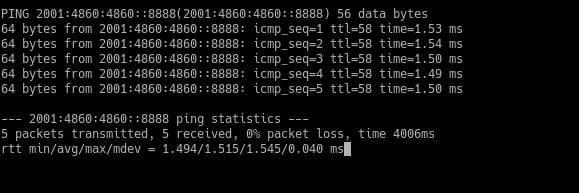
$ ping -6 2001:4860:4860::8888
On old versions, there was ping6 command. On recent versions of Linux, ping6 doesn’t exist anymore, and its functionality has been merged into ping, and it works the same way as you saw.
The basic syntax is as follows:
ping6 [options] [Destination]
With the option -c, we can specify the number of packets to send and with -i for the network interface you will use. For example:
ping6 2001:4860:4860::8888
Ping a specific port
Sometimes we want to know if a specific port on a node is active. However, the ping command does not provide this functionality, but it is possible to do it with the telnet command that is installed by default on Linux.
To do this, just use the following syntax:
telnet [host] [port]
telnet google.com 80

In this way, it is possible to ping a specific port of a network node in a primitive way.
Ping with time
Although the ping command displays useful information, it may be a little simple. However, it is possible to modify the operation of the command a little, to make it show the date the packet is sent.
This can make the information pleasing to the eye and might be useful for scripts and logs.
This syntax is sufficient to do it. However, you need to install the ccze package.
ping [host] | xargs -n1 -i bash -c 'echo `date +%F\ %T`" {}"' | ccze

As you can see, it shows the time for every packet sent.
Ping all the hosts on a given subnet
You can send a ping signal to all hosts on a network or subnet. For this, it is enough to add the option -b and ping the broadcast IP address of any network which ends with 255.
For example:
ping -b -c 4 192.168.1.255

So if the destination is unreachable, maybe they block ICMP packets sent by the ping command, or maybe there is a network problem or a problem on the routing table.
How to end a ping?
By default, the ping command on Linux continuously sends test packets to hosts. However, once the information is available, it becomes necessary to terminate the execution of the ping command.
To do so, simply press the following keys:
CTRL + C
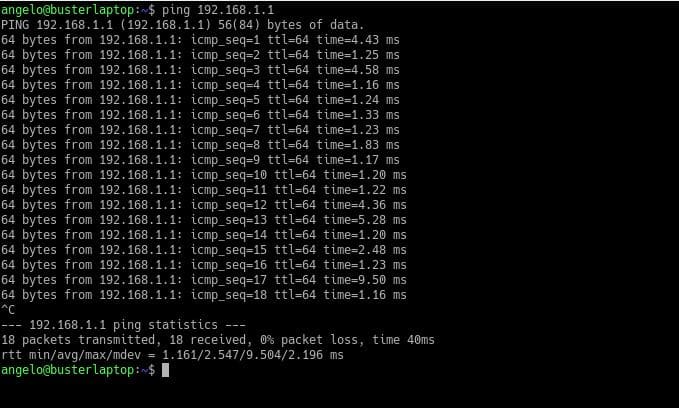
This way, the command will immediately stop working.
End after a specific count
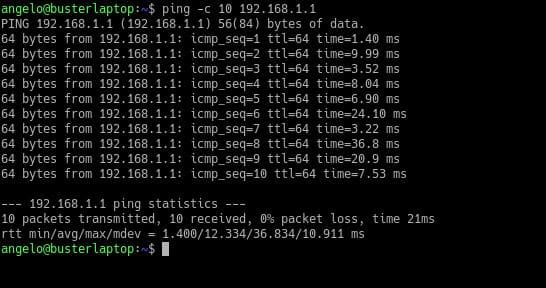
You can limit the count of packets to 10 or whatever. When it finishes sending the ten packets, it will stop.
ping -c 10 [host]
Where does ping command located on Linux?
In a Unix-derived system like Linux, binaries are commonly found in the path:
/usr/bin/
.
In this directory, you will find many binaries that we use as commands on the terminal. In other operating systems of the Linux family, it is also possible to place it in the
/usr/sbin/
directory.
So, we can check it by using the ls command:
$ ls /usr/bin | grep ping

In this image, you can see that the ping commands are located in
/usr/bin/
.
Another way, you can use the which command to locate any command on Linux:
$ which ping
It will show the following:
/usr/bin/ping
Check latency using the ping command
One of the possibilities offered by the ping command is that you can measure the connection response time. That is the latency.
To measure the latency using the ping command, just use it and pay attention to the screen output:
ping -c 4 [host]
ping -c 4 192.168.1.1
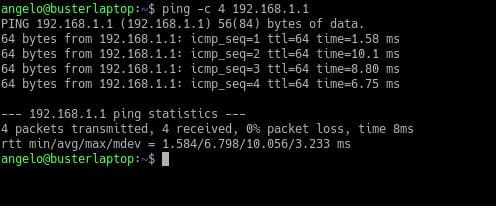
As you can see, four packets have been sent to the destination with a certain response time.
At the bottom, there is a line that starts as follows:
rtt min/avg/max/mdev
The second value after the equal sign is the latency value. In this case, the value is 6.798.

With the latency, it is possible to determine the hosts that have connectivity inferior to the rest. This way, we will be able to take the pertinent measures.
Find the ideal MTU
The MTU (Maximum transmission unit) is a value that statically expresses the size in bytes of the largest data unit that can be sent over a network.
Currently, due to security measures, more and more networks are preventing MTU from working. However, most Ethernet local area networks use a 1500 byte MTU.
If you want to find the ideal MTU value using the ping command, set the initial values, and decrease until there is no error. If the value is too high, we will get the next error:
ping: local error: Message too long
To do this, use the following syntax:
ping -M do -s [initial_value] [host]
For example:
ping -M do -s 1473 192.168.1.1
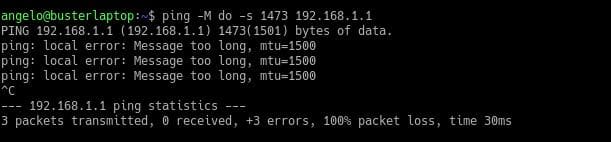
In this case, the value of the package size is very large. So I will decrease it. In this case, the optimal value is 1472.
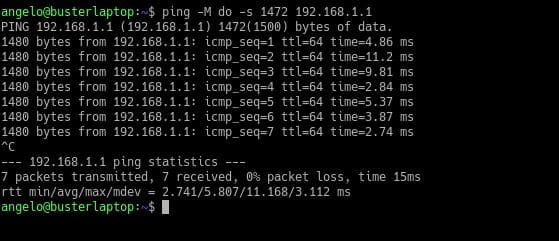
If you get another message, the initial value must be decreased one by one until you get the desired result.
If the MTU value is known, it can be used to improve network behavior, especially if this is a large or even metropolitan network.
Ping on layer 2 (using arping)
With the ping command, we will be able to perform tests knowing the IP address of a specific node within the network. This is because the ping command works on layer 3 of the OSI model (network).
On the other hand, it is possible to use another command that is built into Linux as arping. This command works very similar to ping but works on layer 2 of the OSI model.
The syntax of the command is as follows:
$ sudo arping [Ip_address]
$ sudo arping 192.168.1.1
You will get a result like this:
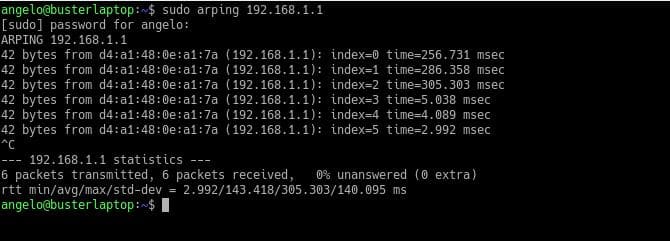
The screen output of the command shows first the size of the sent packet and then the MAC address of the node and the response time.
Note that this command is not installed by default on Debian Linux and derivatives. So you have to install it, then you can run it as root.
Ping a hostname
By default, the ping command sends test packets to the destination using the IP address or the hostname of the destination. It should also be noted that most ping implementations on Linux do not resolve DNS in reverse.
For example, if you use the Ping command by adding an IP address, it will only return the IP address of the host at the output. Conversely, if we have specified a hostname, it will resolve it and show the IP at the output.
Check the output of the following command:
$ ping google.com
Ping route (using traceroute)
The ping command doesn’t show the route from the source to reach the destination.
And this can be quite useful in case the connection with the host has been lost because we can understand at which point the connection has been lost.
The tracert or traceroute command works in a very similar way to the ping command. The advantage of this is that it shows the path that the packet takes, thus showing its route.
Like the ping command comes installed in most Linux distributions. The basic syntax is as follows:
traceroute [hostname/IPaddres]

That way, we can see the route the packets are taking.
Run Command if ping fails
Suppose that you want to be alerted when the ping command fails. To do this, you need to incorporate the ping command in a bash script to set the desired condition.
For example, this shell script allows you to check if the ping command fails:
#! /bin/bash
ping -c 1 [host]
If [ $? -eq 0]; then
    #Your_command_here
Fi
Set the ping packet size
The default size of packets sent by the ping command to hosts is 56 bytes. It’s a low enough value not to affect the operation of the network.
However, it is possible to change it to another value. To do this, simply add the -s option with the desired packet size.
For example:
ping -s [packet_size] hostname/IP
If you want the packet size to be 100 bytes, just use the following command:
ping -s 100 192.168.1.1
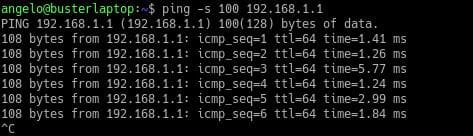
Remember that it may vary slightly by the MTU.
Disable the ping command
If we are responsible for maintaining a network, we may want to disable ping responses at any time. We can do it temporarily or permanently, according to our needs.
If we want to deactivate it temporarily, it is enough to use this command as the root user:
$ su

$ echo "1" > /proc/sys/net/ipv4/icmp_echo_ignore_all

This will disable the ping command response, but only until you reboot the system.
If you want to do it permanently, you have to edit the following file
/etc/sysctl.conf
and add the next line:
$ nano /etc/sysctl.conf
net.ipv4.icmp_echo_ignore_all=1

Then save the file and exit. To apply the changes, use this command:
$ sysctl -p

This will disable the ping command or ICMP packets’ response.
Conclusion
In this post, we have explained in detail how the ping command works on Linux. From its utility till disabling it. Ping is one of the easiest commands to use.
This makes the person responsible for the operation of the network know where the problem is so he can take action.
Mokhtar is the founder of LikeGeeks.com. He is a seasoned technologist and accomplished author, with expertise in Linux system administration and Python development. Since 2010, Mokhtar has built an impressive career, transitioning from system administration to Python development in 2015. His work spans large corporations to freelance clients around the globe. Alongside his technical work, Mokhtar has authored some insightful books in his field. Known for his innovative solutions, meticulous attention to detail, and high-quality work, Mokhtar continually seeks new challenges within the dynamic field of technology.