How to Install & Configure Squid Linux Proxy Server
Linux proxy server or proxy server generally is a server that saves the visited web pages for later requests, so if you try to visit the same web page or anyone else, you’ll get the page from the proxy server.
This is very useful, it makes web surfing much faster and reduces traffic, which means less cost. Caching servers can decrease external traffic to 45%.
Another main advantage for proxy servers, you can configure the proxy with some settings for access control. For example, you can restrict access to specific websites.
If you surf the web before from an anonymous proxy, this is a proxy server. You can choose any of the available Linux proxy servers out there like Squid, Varnish, Polipo, TinyProxy, and more. In this post, we will discuss the most common Linux proxy server, which is Squid.
Install Squid
Installing squid proxy server is very simple. For Red Hat based distro, you can install it like this:
$ dnf -y install squid
Or if you are using Debian based distro, you can install it like this:
$ apt-get -y install squid
Now you can start squid service and enable it at startup:
$ systemctl start squid

$ systemctl enable squid
To squid proxy server, you can check the configuration file in
/etc/squid/squid.conf
Before we dig into the configuration, let’s see the proxy server in action.
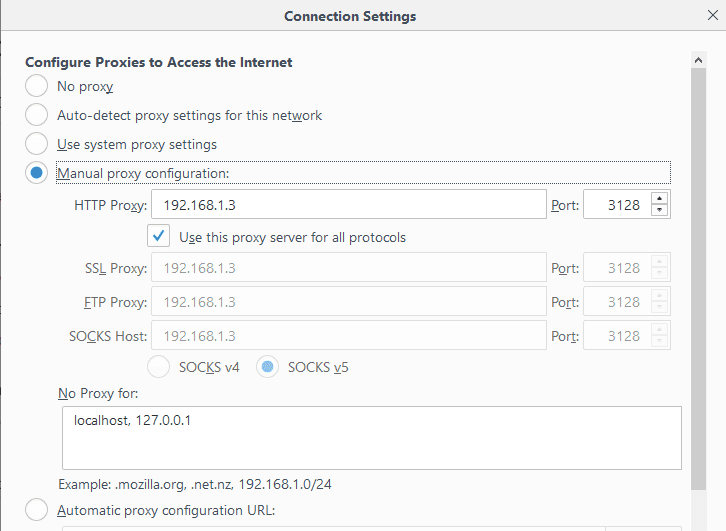
Just change the proxy setting on your browser to the IP address of the proxy and the port 3128 since this is the squid default port. You can change the default port by changing the http_port option in the configuration file.
As shown in the image, I’ve pointed my browser to my Linux proxy server, and I can browse the web without any problems.
If you are using the iptables firewall, don’t forget to open the squid server port.
Allow IP address range
If you open the configuration file /etc/squid/squid.conf, you will see the rules that allow IP addresses to connect to the proxy server like this:
acl localnet src 192.168.0.0/16
However, you can add a new ACL entry to allow a range of IP addresses to connect to your proxy server:
acl localnet src 212.80.113.0/16
Then save the file and restart squid service:
$ systemctl restart squid
Very easy, right?
Also, if you remove any ACL from the file, all IP addresses from that range will not be able to connect to the proxy server.
Allow specific ports
You can find all ports that are allowed in the configuration file like this:
acl Safe_ports port 80
Consider adding Safe_ports ACL rule for any port that your clients need.
You can add a port range instead of writing a rule for every port like this:
acl Safe_ports port 6000-7000
Don’t forget to restart the squid proxy server after the modification:
$ systemctl restart squid
Authenticating users
You can force your users to authenticate before they use your Linux proxy server using Apache authentication.
First, we create a file that will store the users:
$ touch /etc/squid/passwd
Then change the ownership to squid daemon so it can access the file:
$ chown squid /etc/squid/passwd
Now we will create a new user using the htpasswd command:
$ htpasswd /etc/squid/passwd likegeeks
It will prompt you for the password twice.
If you open the created file, you will see the user and the hashed password.
Then you change the squid configuration to tell it about the authentication that it should use.
Add the following lines below the ACL ports and nowhere else to enable authentication:
auth_param basic program /usr/lib64/squid/basic_ncsa_auth /etc/squid/passwd
auth_param basic children 5
auth_param basic realm Squid Basic Authentication
auth_param basic credentialsttl 3 hours
acl auth_users proxy_auth REQUIRED
http_access allow auth_users
Then restart the squid service and try to open the browser again.
$ systemctl restart squid
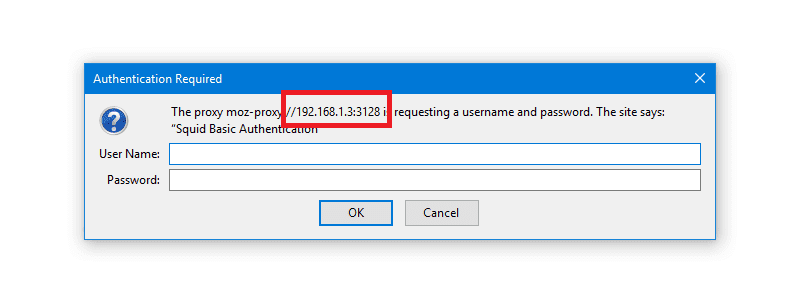
As you can see, if you try to connect to the Linux proxy server, it will prompt you for the username and the password.
Block websites
You can block websites from the proxy users, just create a separate file that will be the list of domains you want to block and point that file from the squid configuration like this:
$ touch /etc/squid/blocked
Then type all websites you want to block one per line in that file and save it.
Now change the squid configuration to block those websites under the acl list and http_access list.
acl blocked_sites dstdomain "/etc/squid/blocked"

http_access deny blocked_sites
Then restart squid service:
$ systemctl restart squid
There are a lot of ready to use lists on the web, you can use them in Squid, like MESD blacklists, Shalla’s Blacklists.
Modify content
Since the Linux proxy server is between the browser and the internet, this is a very good position to alter the delivered content.
You can change images, ads, or whatever using the url_rewrite_program module.
You can do more than that, but we don’t want to be evil.
In our example, we will flip the images and surf the flipped images instead of the original.
First, we need to install ImageMagick:
$ dnf -y install imagemagick
Then we will write the script that will do the magic. The script is in Perl.
You can find the script here.
This Perl script searches for JPG, GIF, and PNG, images in the carried content, once it finds them, it uses mogrify utility that shipped with ImageMagick to flip the images and put the flipped image in /var/www/html/ which is the root directory for Apache server. The apache service should be running, then send the flipped images as a response.
Just make sure to add ownership for Squid for this folder:
$ usermod -aG www-data squid
Finally, you have to tell Squid about this script. Open the configuration file and type the following:
url_rewrite_program /home/likegeeks/flip.pl
Then restart your squid service:
$ systemctl restart squid
The web has a lot of Perl scripts that play with the content, some of them are good, and some others are evil.
Anonymous Browsing
By default squid proxy server forwards the client IP address to the requested site, if you want the proxy to be surf users anonymously, you should send squid IP instead of client IPs.
To do that, change the forwarded_for option to off in
/etc/squid/squid.conf
file.
forwarded_for off
And add the following options mentioned here at the end of the configuration file.
Then restart the service:
$ systemctl restart squid
You can check your public IP address; you will notice that your IP is the squid proxy server IP.
Connecting Squid servers
The cache_peer directive sets your peer caches and informs Squid how to communicate with them.
You can write it like this:
cache_peer hostname Server-type http-port icp-port [options]
The first argument is the other squid hostname or IP address.
The 2nd argument specifies the type of the other server.
The 3rd argument is the port number.
The 4th argument specifies the ICP port (Internet Caching Protocol), which is 3130. We use this port to query other cache servers.
The cache_peer has some options you can use like:
proxy-only: This option prevents Squid from saving any responses it receives from the other squid server.
no-delay: If any delay, it will be ignored.
login= user:password: The authentication credentials to the other server. It takes this formula login =user:password
connect-timeout: This option specifies the connection timeout to other squid servers.
Write your options and save the configuration file and restart the service.
Squid log files
Log files are your main source for problem diagnostics and various squid operations.
There are cache.log, access.log, and store.log. You can find them in /var/log/squid directory.
The cache.log file contains informational messages about Squid’s operation. You can find all proxy errors on this file.
The access.log file contains all clients’ HTTP requests.
The store.log file contains information about the passed objects.
Each entry on these files had its timestamp when the message was generated.
Mokhtar is the founder of LikeGeeks.com. He is a seasoned technologist and accomplished author, with expertise in Linux system administration and Python development. Since 2010, Mokhtar has built an impressive career, transitioning from system administration to Python development in 2015. His work spans large corporations to freelance clients around the globe. Alongside his technical work, Mokhtar has authored some insightful books in his field. Known for his innovative solutions, meticulous attention to detail, and high-quality work, Mokhtar continually seeks new challenges within the dynamic field of technology.


Great job bro. I was looking for to configure squid on my network and here i found out all necessary information thanks again
Thank you very much. You are always welcome.
Regards
This is really great post. Well documented. Thanks and keep posting.
Thank you very much. I’m doing my best to make posts like that. all my experience and friends and others collected then presented as you see.
Regards.
The dnf package manager is NOT in any Red Hat Enterprise Linux-based distros and there is no such things as “Red Hat based” distribution; Red Hat is a company NOT a distribution name. The dnf package manager ONLY exists in Fedora Linux or its derivatives like Korora Linux, both are community distributions. Also, I am quite sure that a normal system user CANNOT create/modify files outside his/her home directory – so WTF is “$ touch /etc/squid/passwd” or “$ usermod -aG www-data squid”. Check your facts and proof-read your stuff before you publish anything.
Since yum in obsoleted, dnf is used.dnf can be installed in Red Hat based.
I’m not the only one saying that. Wikipedia also says it
https://en.wikipedia.org/wiki/Red_Hat_Enterprise_Linux_derivatives
Regarding editing file touch /etc/squid/passwd. I suppose that readers have a little knowledge to know that root only can do that and if you review other Linux posts you will have more understanding.
The same goes for usermod and chmod.
I think that I can publish what I want and you read what you want.
Yum is still supported in all currently supported RHEL-based distros. It will be supported until 2024 and thus people in Red Hat will still ensure yum’s survival by contributing code either by fixing it or backport from libzypp or dnf – like they do for many of their core stuff – you are right that it is no longer actively used in Red Hat sponsored community distros and its deriatives – which was not what I used as reference. You can theorectically make apt-get work in RHEL if you put your mind to it, cue PCLinuxOS – the only apt-get on RPM distro still in active development. Yes, the future RHEL 8 and its clones will most probably have dnf by default – but until an official annoucement is made it will be mere grapevine chatter – you would recall the numerous speculations over the default UI for RHEL 7. You also have VERY LOW opinion of your readers by commenting, “readers have a little knowledge to know that root only can do that and if you review other Linux posts” – the fact is, I do a lot of reviews. I am effectively the go to “Linux guy” at where I work – and I also write a tons of documentation and training and also do a lot of reviews of posts, articles and from the printed media. You need to start respecting your audience. Saying that others make the same mistakes and dumn your readers will not know the differences is pure laziness, arrogance and incompetence
Thank You for the great post, how can I make squid authenticate with the Windows Active Directory?
Thank you very much.
To authenticate with Active Directory, you can use this guide
http://wiki.squid-cache.org/ConfigExamples/Authenticate/WindowsActiveDirectory
Hope it helps you